2. Publishing data in GeoServer
- Hugo Martins
The following steps need to be followed in order to publish new spatial data in your GeoServer installation.
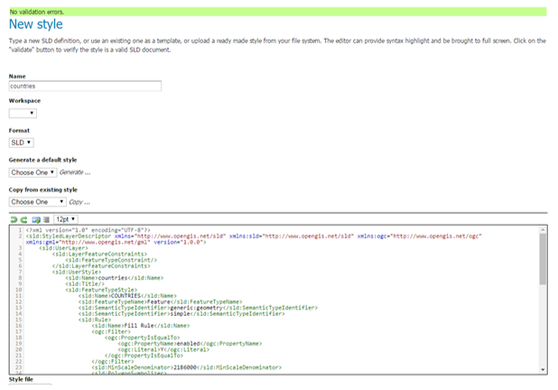
1. Add new styles (SLD)
By default, GeoServer only supports styles through the use of SLD (Styled Layers Descriptor) standard files. Lots of examples and documentation can be found at http://docs.geoserver.org/2.8.3/user/styling/sld-cookbook/index.html
- Navigate to “Styles” and press the “Add new style” button
- Give your style a new name
- Paste your SLD into the text area or choose file to upload from your local computer
- Validate your style by pressing the “Validate” button
- Only submit your style if the validation retrieves no errors (like the next example)
2. Publish a new Layer
There are several possibilities to publish layers in Geoserver which are mainly related to the type of the data source you will be feeding GeoServer with. In the following section three procedures will be described:
- Publish data that has been imported (by using GIS desktop systems or command line tools) into the spatial database (schema: spatial) shipped with Union VMS.
- Publish data that has been imported into a spatial database
- Publish a shapefile
For performance reasons, it is recommended that all vectorial data being served by Geoserver is stored in a spatial database and that all optimizations have been done previously (e.g. building spatial indexes, geometry generalization, …)
2.1 Publish data imported into Union VMS database
- Navigate to “Layers” and press the “Add new resource” button
- In the next screen, choose “uvms:uvmsdb” option
- From the list, choose the table you wish to publish (e.g. countries)
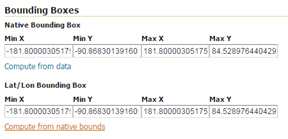
- Make your layer specific settings:
- In the Data tab:
- Accept all defaults
- In the “Bounding Boxes” section press the “Compute from data” and “Compute from native bounds” options
- In the Data tab:
- In the Publishing tab:
- Set the default style (this style should have been previously imported to Geoserver, e.g. countries)
- In the UnionVMS application multiple styles for the same layer are supported. Normally it supports up to three different styles:
- Only geometry (normally set as the default style)
- Geometry with labels
- Only labels
- If you have more than one style for a layer, drag the remaining styles (styles previously imported to Geoserver) into the “Selected styles” section (e.g. countries_label and countries_label_geom)
- In the Publishing tab:
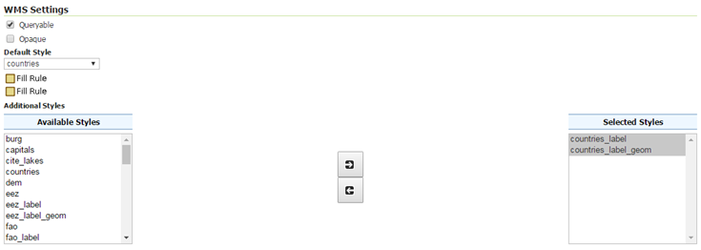
- Finally, press the “Save” button
2.2 Publish data imported into a different spatial database
You will first need to configure a datasource in your application server
<datasource jta="true" jndi-name="java:jboss/datasources/my_db" pool-name="my_db" enabled="true" use-ccm="true">
    <connection-url>jdbc:postgresql://localhost:5432/mydb</connection-url>
    <driver>postgresql</driver>
    <security>
        <user-name>myuser</user-name>
        <password>mypassword</password>
    </security>
</datasource>
- In the GeoServer admin page, navigate to “Stores” and press the “Add new store”
- Select the “PostGIS (JNDI)” option and apply the following configurations:
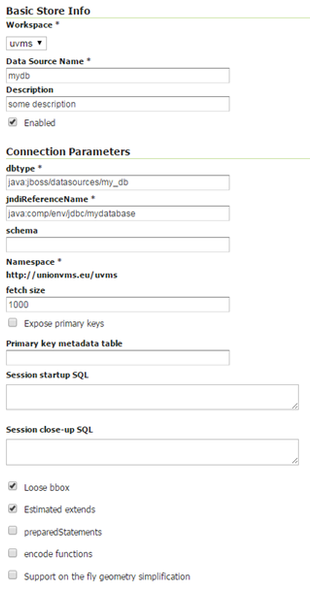
- Be sure to uncheck the option “Support on the fly geometry simplification”, and press “Save”
- Navigate to “Layers” and press the “Add new resource” button
- In the next screen, choose “uvms:mydb” option
- From the list, choose the table you wish to publish
- Make your layer specific settings like it was described in the previous procedure (2.1)
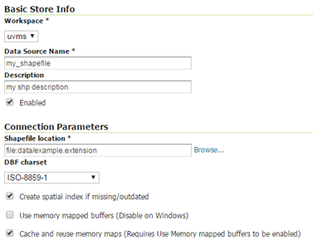
2.3 Publish a shapefile
- Be sure that your shapefile is uploaded in the same server where you have your application server running
- In the GeoServer admin page, navigate to “Stores” and press the “Add new store”
- Select the “Shapefile” option and make the necessary configurations:
- Define a name
- Define a description
- Browse to your shapefile through the “Browse” button
- Set the character encoding of your shapefile
- Accept the remaining values as defaults