Union VMS - User Manual
- Former user (Deleted)
- João Manuel Matos Génio
- JoakimJ
- sumeela
Welcome to Union VMS!
What is Union VMS?
Union VMS provides you with real-time information on ship movements and ports. It allows you to track active assets through live position reporting.
Union VMS also allows you to view, export and print reports to secure that responsible and legitimate fishing is performed.
Who should use Union VMS?
It is intended that the on-site team who is responsible for the asset tracking and reporting system, is to be responsible for maintaining the Union VMS. It can be used by several users with different accounts.
Using the Union VMS manual
This guide will help you learn how to use the Union VMS software and navigate through the system. For information on specific Union VMS features, refer to one or more of the following sections or appendices.
Section 1: Login Instructions on how to login to Union VMS.
Section 2: Main navigation & Settings A brief overview of the system, understanding the navigation and how to configure the basic settings.
Section 3: Assets Step-by-step guide on how to search for assets and how to add new ones into the system.
Section 4: Mobile terminals Step-by-step guide on how to search for terminals, how to add new terminals to the system and how to link assets to terminals.
Section 5: Reports Shows a live view over the geographical position of the sending assets. This page displays all the accessible reports for the user in a manner similar to other GIS (Geographic Information System) applications.
Section 6: Positions Step-by-step guide how to search for position reports and how to send out manual reports.
Section 7: Polling Step-by-step guide how to send out poll requests to active mobile terminals.
Section 8: Alarms How to set what rules the system should check to be followed. Any infraction results in an alarm notification.
Section 9: Exchange Overview of all incoming and outgoing messages in the system. Exchange is working as the systems communication hub.
Section 10: Area management How to create, save and manage user and system defined zones.
Section 11: User management Step-by-step guide of the user authentication, user authorisation and the management of user data and related data.
Section 12: Glossary A glossary list of all technical terms and shortenings used in the system.
Section 1 Login
Login
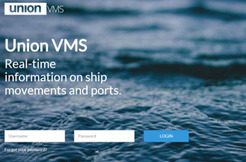
- From your computer's browser, access the link location of the UVMS installation.
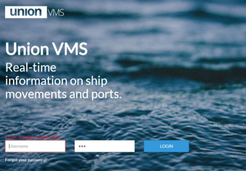
- Fill in your username and password in the text fields.
- Click on the "Login" button.
Incorrect credentials
- A notification text shows, saying that the credentials are invalid.
- Please try to fill in your username and password again.
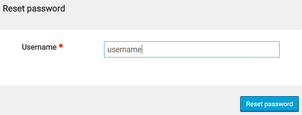
Forgot your password?
- Click on the "Forgot your password" link.
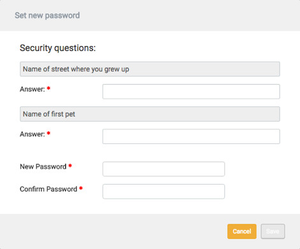
- Fill in your username in the pop-up window and click on the "Reset password" button.
- A new prompt will appear asking you to answer your security questions. Here can you set a new password.
Section 2 Layout description & Settings
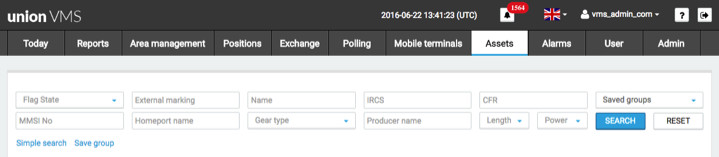
The picture below provides a brief overview of Union VMS. It also provides instructions for basic language and user account settings.
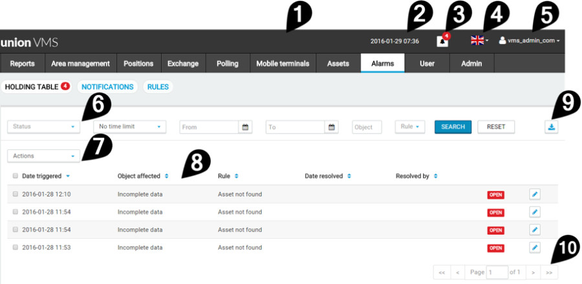
1 Main navigation bar | 6 Search fields |
2 Date and Time | 7 Actions dropdown list |
3 Active Alarm Icon | 8 Result list |
4 Language Settings | 9 Export list |
5 User Settings | 10 Page navigation |
Main navigation bar
- Once logged in, the main navigation bar becomes visible. This navigation bar is consistent throughout the system and will be shown at all times.
- You navigate through the system by clicking on the links in the navigation bar to reach desired page.
Date and time
- Date and time is shown on top of the page.
Active Alarms Icon
- An Icon showing how many alarms are currently active.
- By clicking on the icon, you automatically link to the alarm page where you find extended information regarding the alarms.
- More information about the Alarms, see Section 8: Alarms.
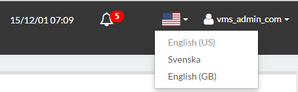
Language Setting
- A flag icon is illustrating the language of your choice.
- To change language settings, click on the flag icon and choose preferred language in the dropdown list by clicking at it.
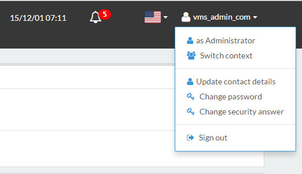
User Settings
All personal user settings are listed in a dropdown list under the username found up in the right corner of the page. For more information, see Section 10: User management.
- Click on the arrow next to the user name to reach a dropdown list with different choices.
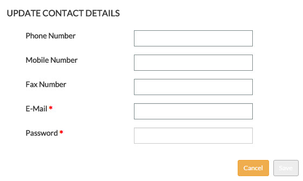
Update contact details
- Select the option "Update contact details" in the dropdown list.
- Fill in your new contact details in the pop-up window and the click on the "Save" button.
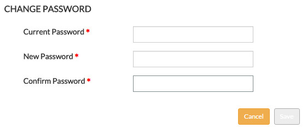
Change password
- Select the option "Change password" in the dropdown list.
- Fill in the mandatory information in the pop-up window and then click on the "Save" button.
- The new password will now be saved.
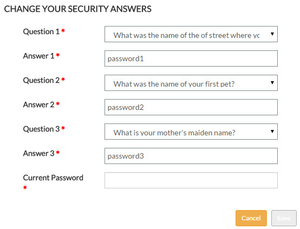
Change security answer
- Select the option "Security answer" in the dropdown list.
- Fill in all mandatory information in the pop-up window and then click on the "Save" button.
Sign out
- Click on the "Sign out" button in the dropdown list.
- Sign out from the system and end up on the start page again.


Symbols
There are recurrent symbols throughout the system. They are illustrated with each function description in the Table 1 below.
Table 1: Symbols
| Settings/Configure Click on it to configure the list item. |
| Mark report as default Click on it to make the selected report your default one. This will automatically be run when you log in to the system. |
| Share Click on it to change the visibility of this report to either: Public, Private or restricted to your Scope. |
| Run report Click on it to run the selected report. Clicking on the right arrow will give you an option of running the report in a new tab. |
| Close Click on it to return to the previous page. |
| EditClick on it to open up for editing information. |
| View Click on it to view details. Unlike the editing icon, this means the information in the modal can only be viewed and not changed. |
| ExportExport the information to CSV format. A file will be downloaded into the computers downloaded files. |
| PrintSend the page to printer. |
| DuplicateClick on it to duplicate selected item. |
| RemoveClick on it to remove selected item. |
| CommentClick on it to view comment regarding selected item. |
| Alarms/NotificationsClick on it to view all rules notifications. |
| HelpClick on it to view guides and help on using the system. |
| Log outClick on it to log out from the system. |


Section 3 Assets
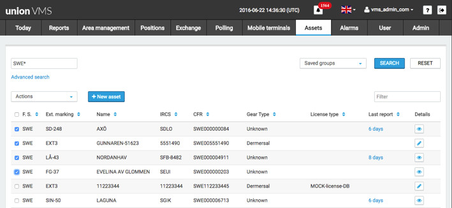
The Assets view provides a list of all existing assets. This is where to add new assets to the system.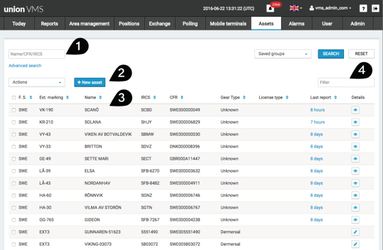
1 Search for assets | 3 List of existing assets |
2 Create new asset | 4 Filter result |
Search for assets
- Search by using the simple search or the advanced options.
- It is also possible to perform wildcard searches. Type in the letter followed by a star * in order to search for all matches.
Advanced Search
Expanded search area to reveal advanced search options.
- For more search options, click on the link "Advanced search". See pictures below.
- To speed up the search functionality, perform search through specific fields only.

Save assets in a dynamic group
When performing an advanced search, it is possible to save that search as a dynamic asset group. What this means is that the assets in this Dynamic Asset Group will update based on whether they fulfill the search criteria or not.
For example, saving a search for Flag state = "SWE" & Gear type = "Demersal" & Length = "12 – 14,99m" as a dynamic group, would mean the group always updates when new assets are added/removed in the system that match that criteria.
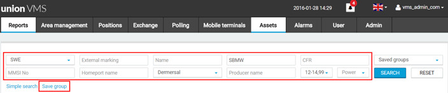
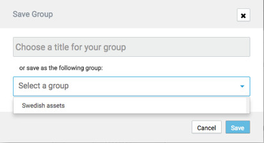
- Click on the "save group" link.
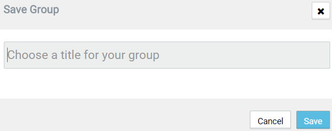
- Type in a title for the dynamic group and click on the "Save" button.
Save assets in a static group
Selecting out specific assets in the results list and saving them as a group will result in a "static" group. As opposed to the dynamic one, the assets included in this will always be the ones you selected.
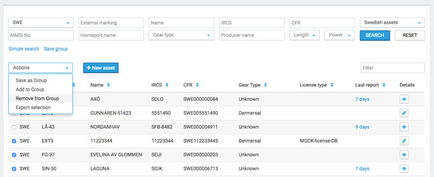
- Select which results should be saved by clicking in the box left to it. See picture below.
- Once the selection has been made, choose the alternative "Save as a group" in the dropdown list under "Actions". See picture below.
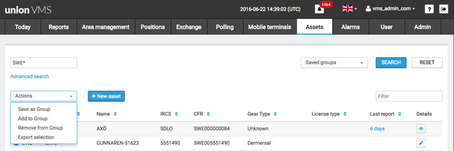
- Add a title to name the group or choose to save as an already existing group by select an alternative in the dropdown list. See picture below.
Adding assets to a group
- Select which assets should be added by clicking in the box left to it. A modal will come up asking which group would you like to add to. See picture below.

Removing assets from a group
- Select the group you would like to edit from the dropdown on the right.
- Select which assets should be removed by clicking in the checkboxes next to them.
- Under the Actions dropdown, select Remove assets.
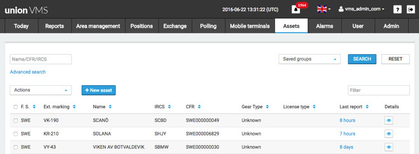
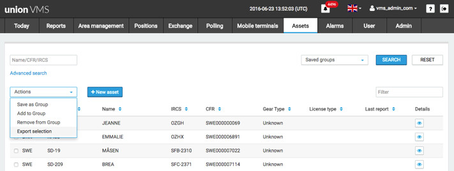
Sort assets
- The result can be sorted in descending order, click on the arrow in preferred column of the result list to change the order of the presented result. See picture below.
- Click again on the arrow and it sorts the list in an ascending order.
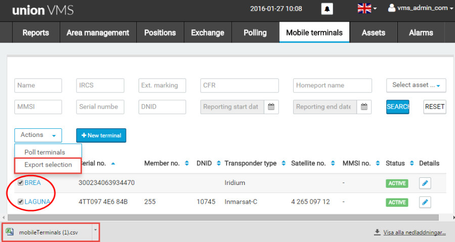
Export asset selection
It is possible to export one or multiple mobile terminals from the list to a CSV file.
- Select required assets by clicking in the box left of them. See picture below.
- Once the selections have been made, choose the alternative "Export selection" in the dropdown list under "Actions". See picture below.
- The file will be downloaded to the computer and stored in "Downloaded files".
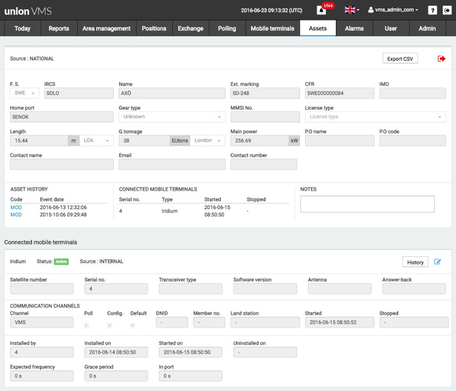
View details
To view extensive details about the asset, click on the "Edit" button under the column "Details" in the result list, See picture below.
Note: The icon next to an asset shows Edit (pen-icon) if the asset is editable and View (eye-icon) if the item is not. In this case, the item is read from the national assets database (alternatively from the EU register) each time a new position comes in. Therefore you cannot edit this asset locally.
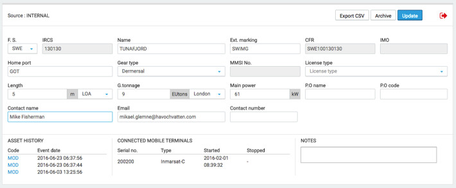
- The upper half of the screen shows the asset details, followed by the connected mobile terminals on the lower part.
- Details can be exported by clicking the "Export CSV" button.
- To go back to the previous page, click on the "Close" button.
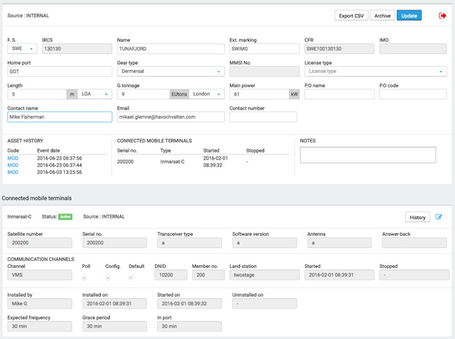
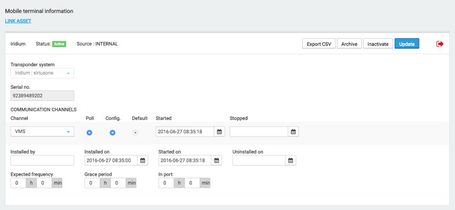
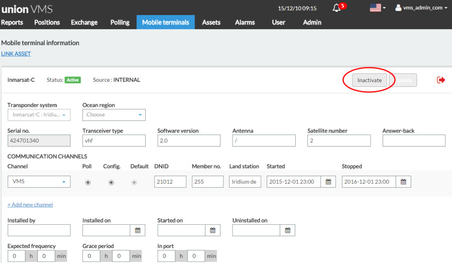
Update details
- Once you have opened the asset details, you can start making changes to the information.
- The source must be "INTERNAL" in order to have the rights to update details. See marking in the picture below. If your system installation is coupled to a national asset registry/database, then changes in the information need to be made there.
- Fill in changes in the text fields and click on the "Save/Update" button to save changes. Once the new changes have been saved they will show up in the "Asset History" column down in the left corner. See marking in the picture below.
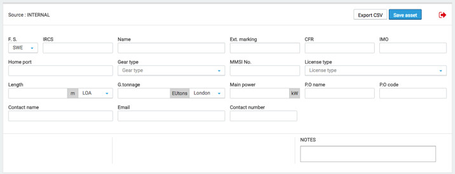
Add new asset
- Click in the "New Asset" button.
Fill in all needed details in the form and click on the "Save asset" button.
Note: that at the moment License types are not fully supported.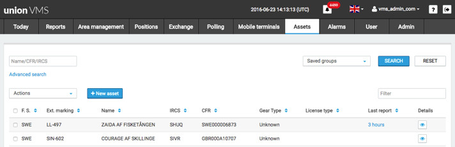
 Note: that all required fields must be correct filled in. Otherwise a feedback message will appear saying that the asset cannot be created. See picture below.
- Once the asset is added, a feedback message will confirm that.
![]()
Assign mobile terminal to asset
- See more in Section 4: Mobile Terminal: Assign to asset.
Archive asset
- To archive an asset, click on the "Details" button to open up the asset settings.
- Click on the "Archive" button up to the right, see picture below.
- Then add a comment to why the asset is archived and click "Yes" in the pop-up window.
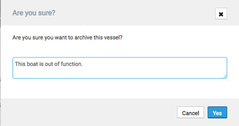
- A feedback message will show for a few seconds, confirming that the asset has been archived.
![]()
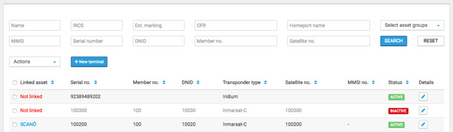
Section 4 Mobile terminals
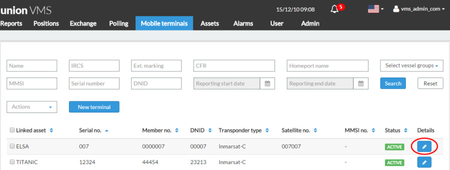
In order to access the mobile terminals page, click on "Mobile terminals" in the main menu bar. The default view of this page shows an overview of registered mobile terminals and their current status. 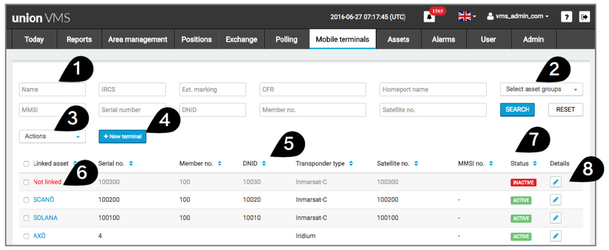
1 Search fields | 5 Sort in descending order |
2 List terminals per asset group | 6 Mobile terminal not linked to asset |
3 Actions dropdown list | 7 Mobile terminal status |
4 Add new terminal | 8 Details |
Detailed information
- To reach more detailed information about a terminal, click on the "Details" button to the right in the list. See illustration above.
Status
The status of a mobile terminal can be Active or Inactive. When a mobile terminal has been made inactive, it will be greyed out in the list.
View terminals by asset group
By selecting a group, all terminals assigned to the assets in that group get listed.
Search for mobile terminals
Use the search fields to find mobile terminals.
- Fill in the different fields with information of choice.
- Click on the "Search" button to find matching mobile terminals.
- The search result will be listed below with all relevant information.
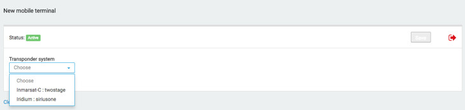
Add new mobile terminal
When adding a new terminal, click on the "Add new" button to reach the "New mobile terminal" page.
Please follow the following instruction steps in order to add a new mobile terminal to the system.
1. Select transponder system Select which transponder system to be used. The list of available systems will be shown as a dropdown menu when clicking on the icon. This list is dynamic and is based on whether your system has a plugin installed for a certain transponder system. See picture below.
2. Insert relevant information.
Select ocean region from the four available options in the dropdown list. It is possible to select multiple alternatives. Continue by adding mobile terminal information in their respective fields.
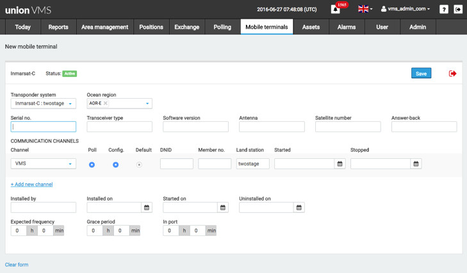
3. Add communication channels At least one communication channel must be added in order to complete the form. It is possible to add several channels.
Assign mobile terminal to asset
The first communication channel in the list should be the main one used by the terminal to communicate. This is marked by the Default checkbox. The user can select which channel to use for manually Polling the asset and which to use when sending Configuration polls.
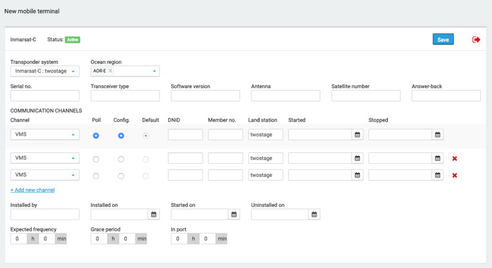
4. Save the mobile terminal Save the mobile terminal by clicking the Save button in the upper right corner.
- If you have just saved the terminal, then you should immediately get more options to link it to an asset. These become available on the top of the screen.
- Otherwise, from the main Mobile terminals page, use the search field to find a mobile terminal to link. Click on the "Details" button in the right column in the list.
- Click on "Link asset" to open search field for assets. See pictures below.
- Use the search fields to find asset and then click on the search button. See picture below. If the asset you want to link to does not exist, you first need to create one under Assets.
- Choose asset by clicking on the "Select" button. See picture below.
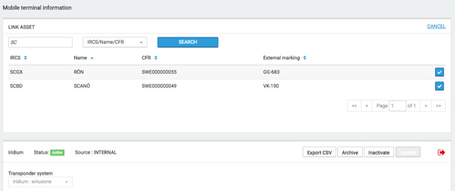
- Click on the "Link" button to connect the asset to the mobile terminal. If this is not the wanted asset, then you can go back by clicking "Go back to the search result." See picture below.

- Type in reason for linking mobile terminal to asset and click on the "Link" button.
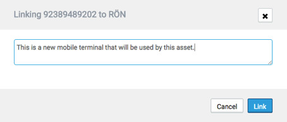
- A feedback message will show for a few seconds confirming the action.
![]()
Unlink asset from mobile terminal
- To unlink a mobile terminal from an asset, select the mobile terminal by clicking on the "Details" button in the right column in the list.
- Click on the "Unlink" button.
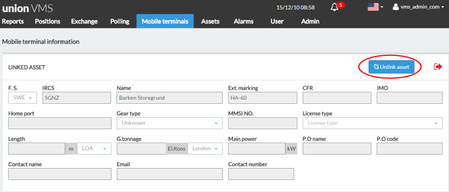
- Type in reason for unlinking and click on the "Unlinking" button to save changes.

- A feedback message will show for a few seconds, confirming the action.

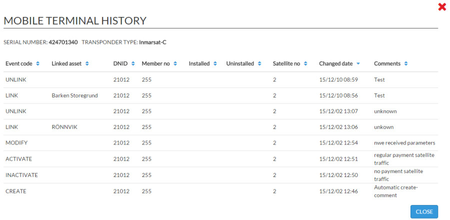
Access mobile terminal history
- Select mobile terminal through the "Edit" button under the "Details" column.
- The mobile terminal's details will open. In the lower left corner is the "View history" link, click in it to open the history information.
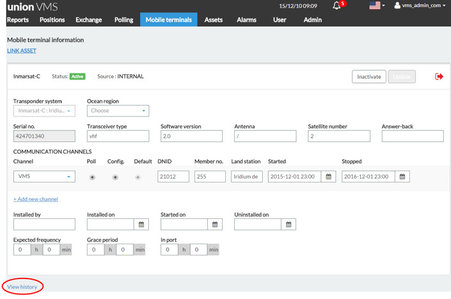
- To close the history window and go back to previous view, click on the "Close" button.
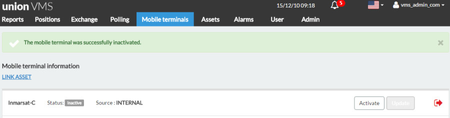
Activate mobile terminal
- Select mobile terminal through the "View Details" button.
- Click on the "Activate" button.
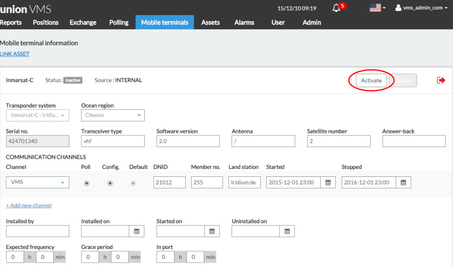
- Type in a reason and click on the "Activate" button.
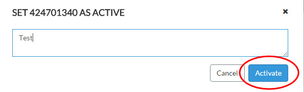
- A feedback message will show for a few seconds, confirming the action.
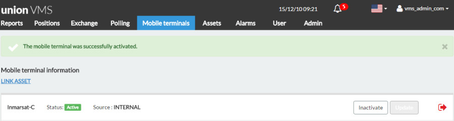
Inactivate mobile terminal
- Select mobile terminal through the "View Details" button.
- Click on the "Inactivate" button.
- Type in reason for changes and click on the "Inactivate" button.

- A feedback message will show for a few seconds, confirming the action.
Section 5 Reports
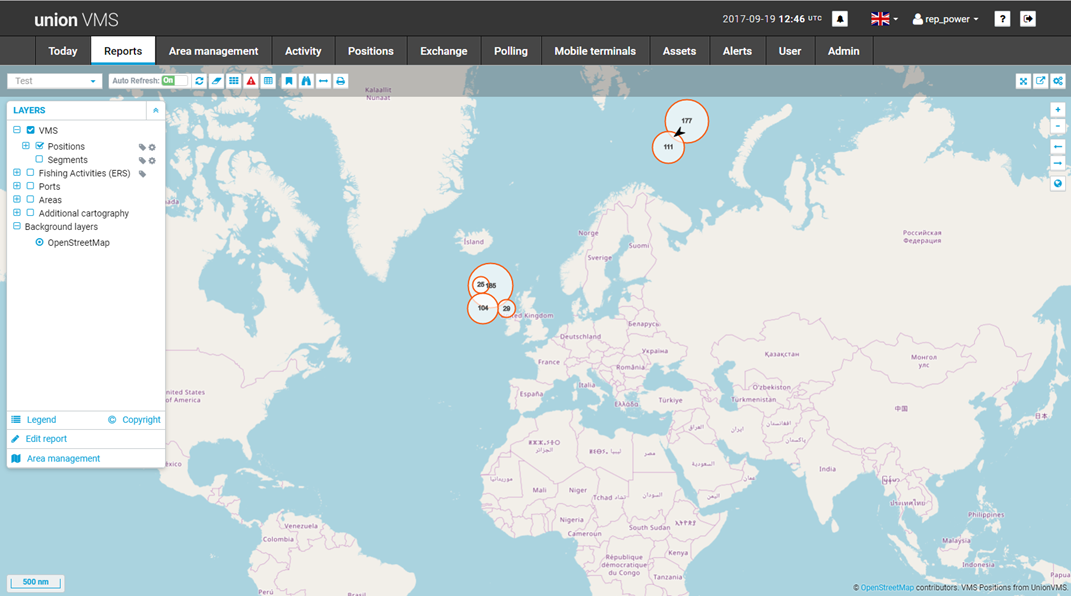
The "Reports" in the main menu shows a live view over were reporting assets are located. This page displays all the accessible reports for the user. The "Reports" page is divided into "Line view" and "Reports"
Live view
Map
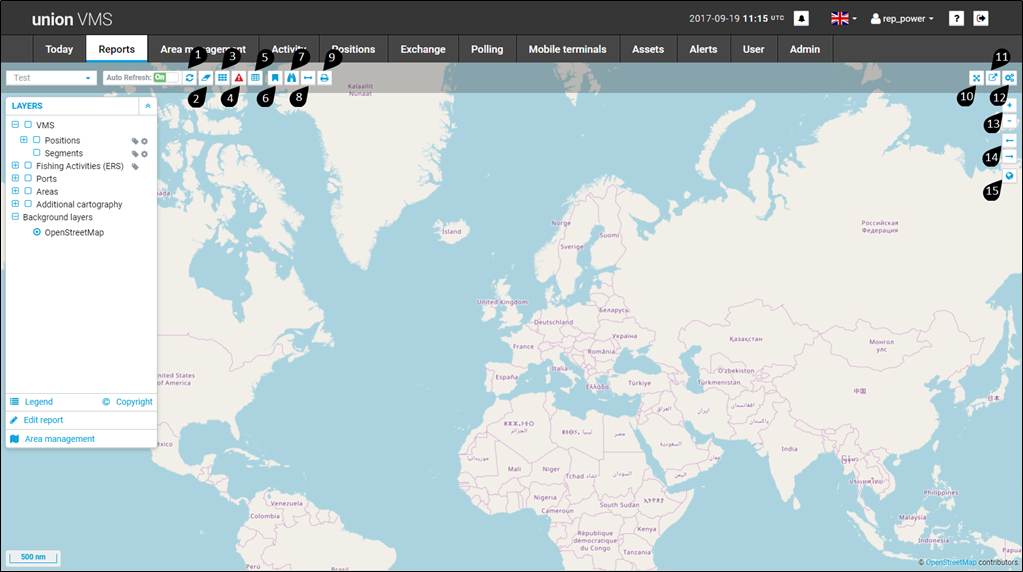
| 1 Refresh | 2 Eraser – Clear map highlights | 3 Enable map graticule | 4 Fetch alerts from current map | 5 Open tabular view |
| 6 Bookmarks | 7 Search places | 8 Measure distance | 9 Export map | 10 Toggle full screen |
| 11 Open map on new tab | 12 User preferences | 13 Zoom in/Zoom out | 14 Previous extent/ Next extent | 15 Zoom to full extent |
Measure distance
Allows calculation of estimated time of arrival based on the criteria selection of measure configuration panel (supported units are meters, nautical miles and miles):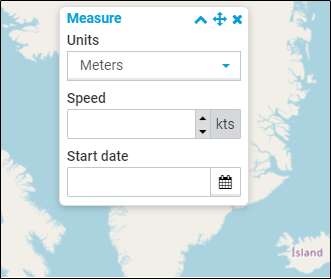
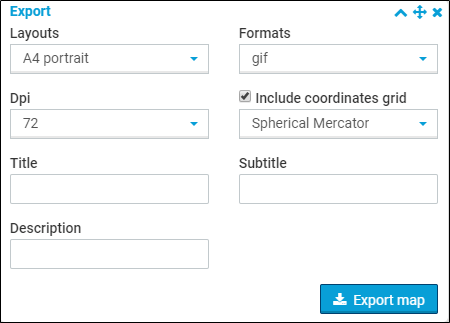
Export Map
Export the current map view to an image format (supported formats are PNG, JPEG and PDF):
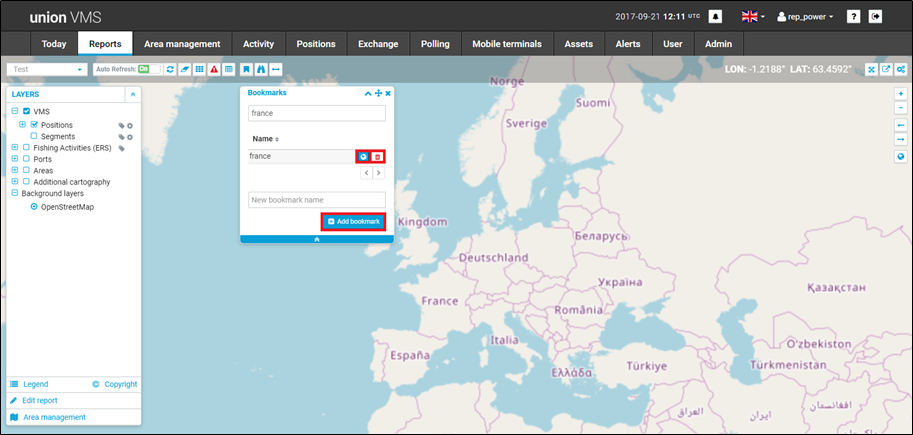
Bookmarks
Bookmarks helps the user to save the current state of the map
- User can create the new bookmark, name the bookmark and click on "Add bookmark" to save the bookmark.
- All the bookmarks are displayed as a list.
- Click on the "globe" button to view the selected bookmark and on "remove" to remove the bookmark from the list.
Zoom in/out
Zoom in/out the map (also works with "+"and "-" keys and mouse wheel)
History
Go back/forward between map navigations (keeps track of the latest 50 steps)
Eraser
Clear map highlights (related to the zoomTo and panTo functionality)
Full-screen
Activates full-screen mode
Layer tree handle
Opens the layers tree and legend panels: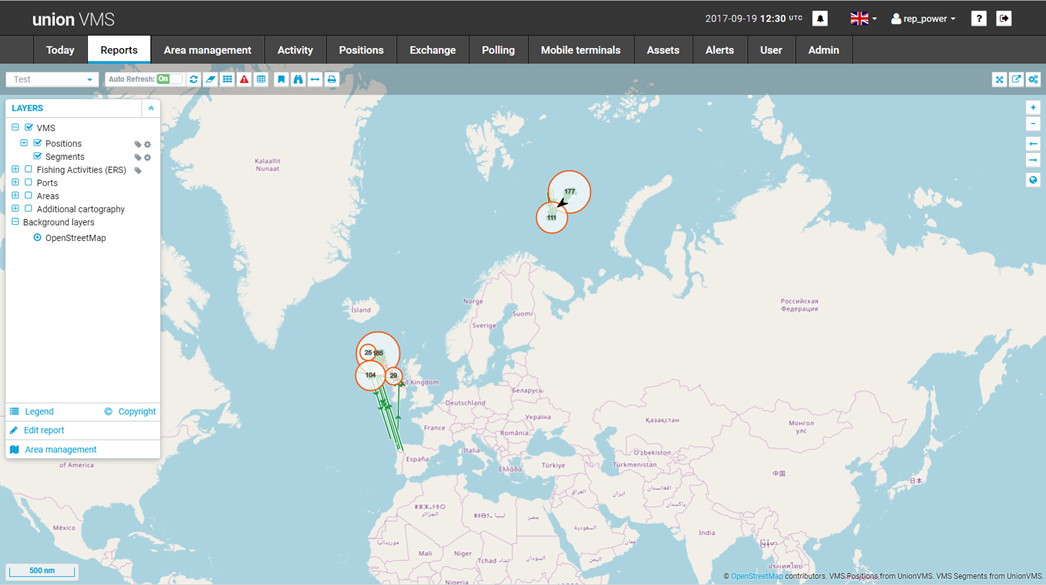
On the layers panel you can specify which layers are visible. Here you can also order the layers (drag and drop) to control the order of the layers over the map.
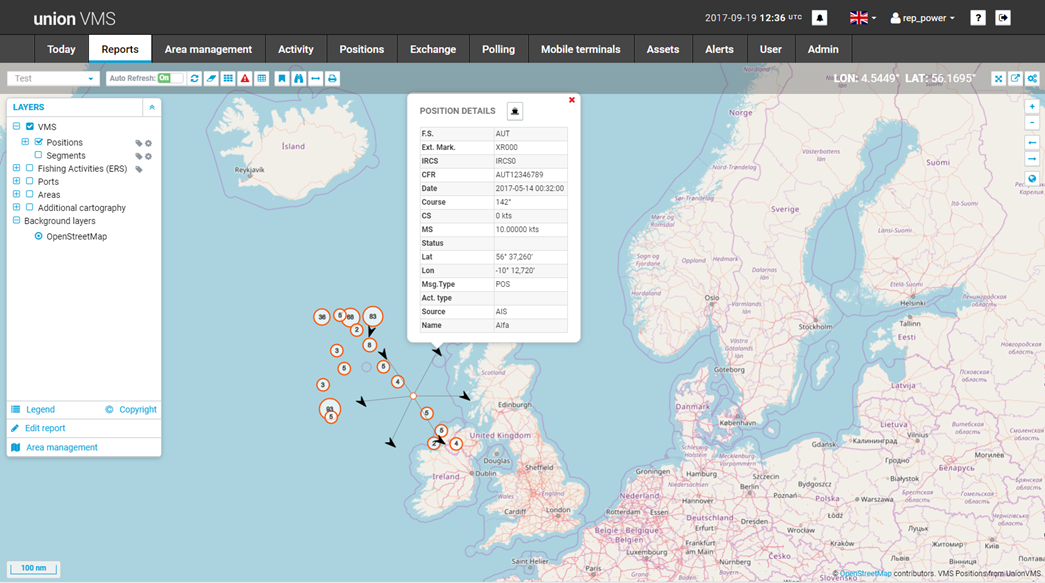
select the position node to view all the positions and click on any position to see the position details.
For the segments, you can do the same but instead you have to select it on the segments node:
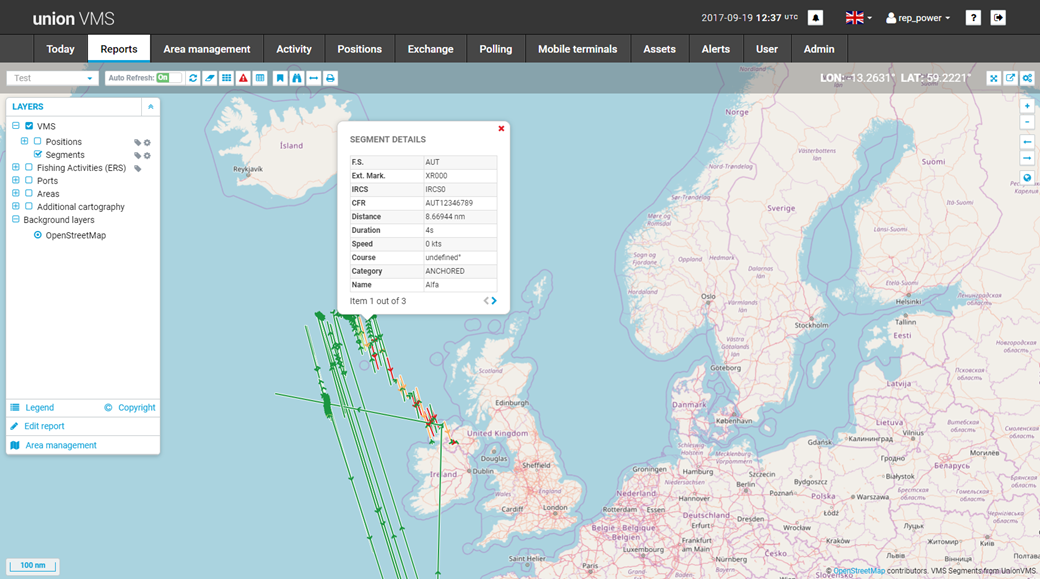
click on the  icon to watch the same information in the table .
There are 4 types of tables
- Positions
- Segments
- Tracks
- Trips
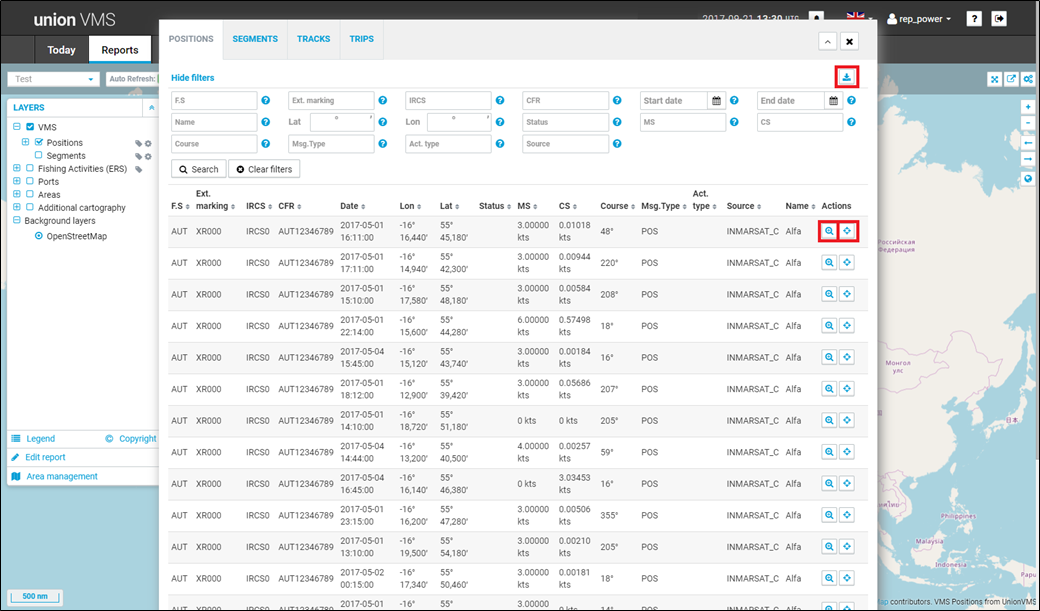
- It's also possible to export this data if you click on the export button on the right side of table toolbar in csv format with wkt.
- On this specific table there's a filter panel where you can define a parameter for each column. The filtered result will consider all the filters applied.
 - Option for every row, to Zoom to the position or segment or track or trip in the map.
 - Option for every row, to pan to the position or segment or track on the map.
Now, we will briefly look into the trips tab.
Trips
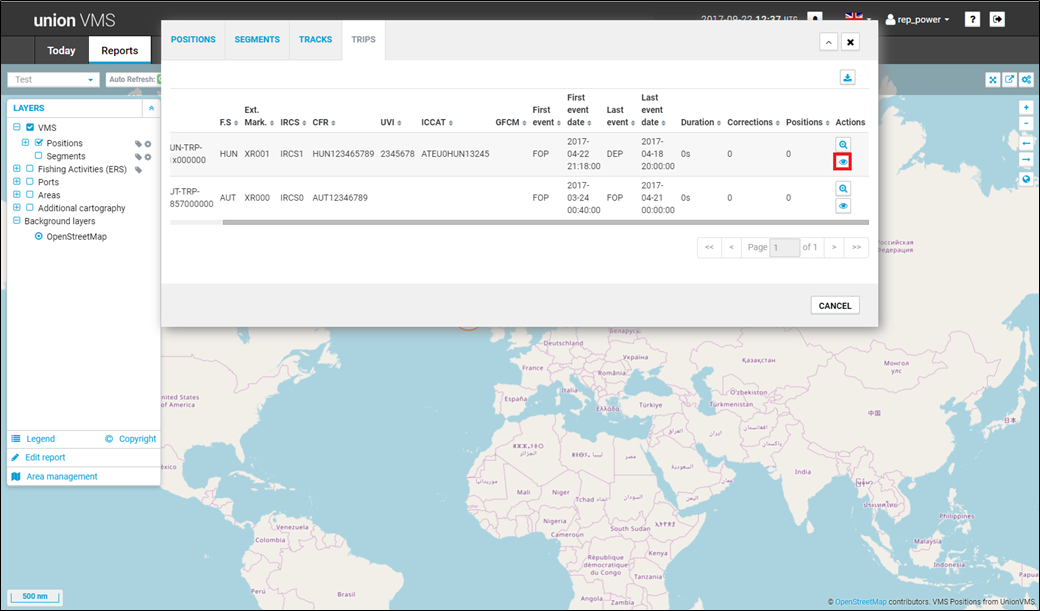
 - click on the details button to open the summary view of the trip as shown below:
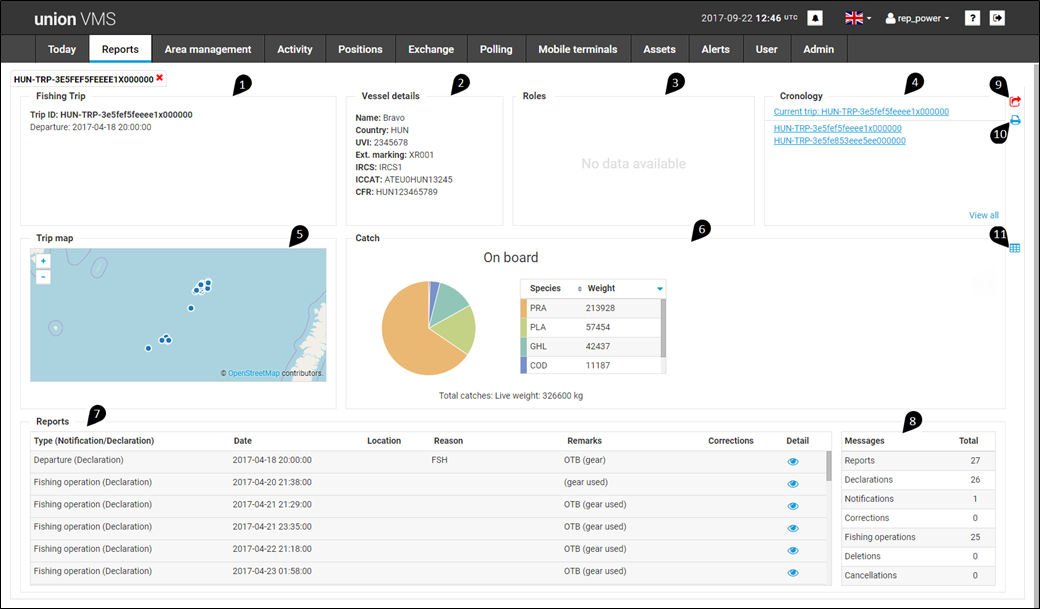
| 1 Fishing Trip - displays the details of the current trip |
| 2 Vessel details - displays the details of the Vessel |
| 3 Roles - displays the "master" details of the vessel |
| 4 Cronology - displays the list of available trips |
| 5 Trip map - displays the fishing activity deatils on the map |
| 6 Catch - displays the details of all the catch in charts and table format |
| 7 Reports - displays the list of fishing activities in the current trip |
| 8 Messages - displays the statistics of reports in the reports panel |
| 9 back button- to go back to the trips table view |
| 10 print - prints the trip summay report |
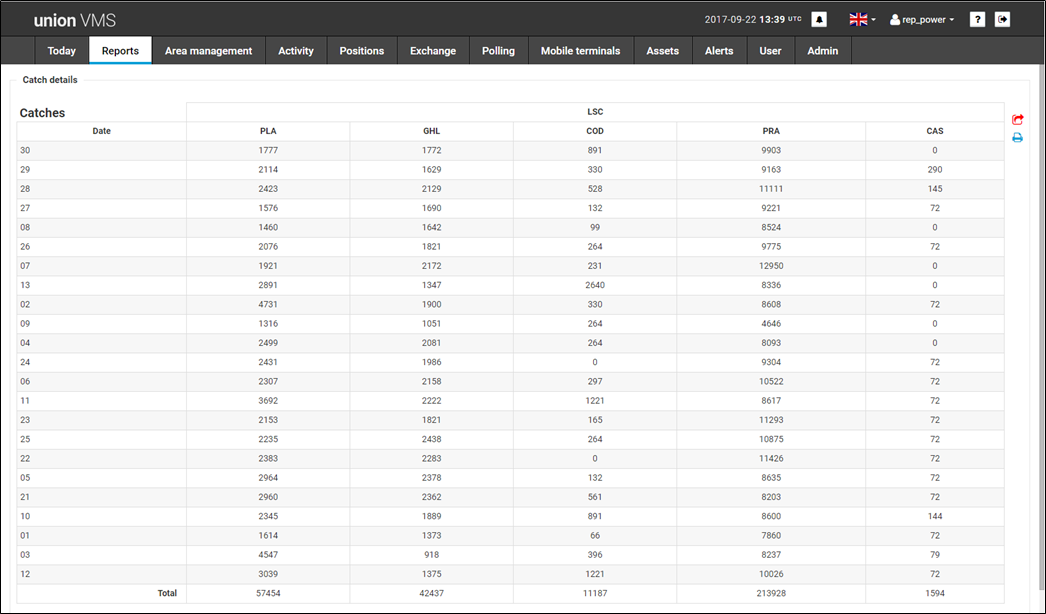
| 11 table icon - on click will take to the catch details page |
Catch Details
catch details page display the details of the cathes in the tabular format.
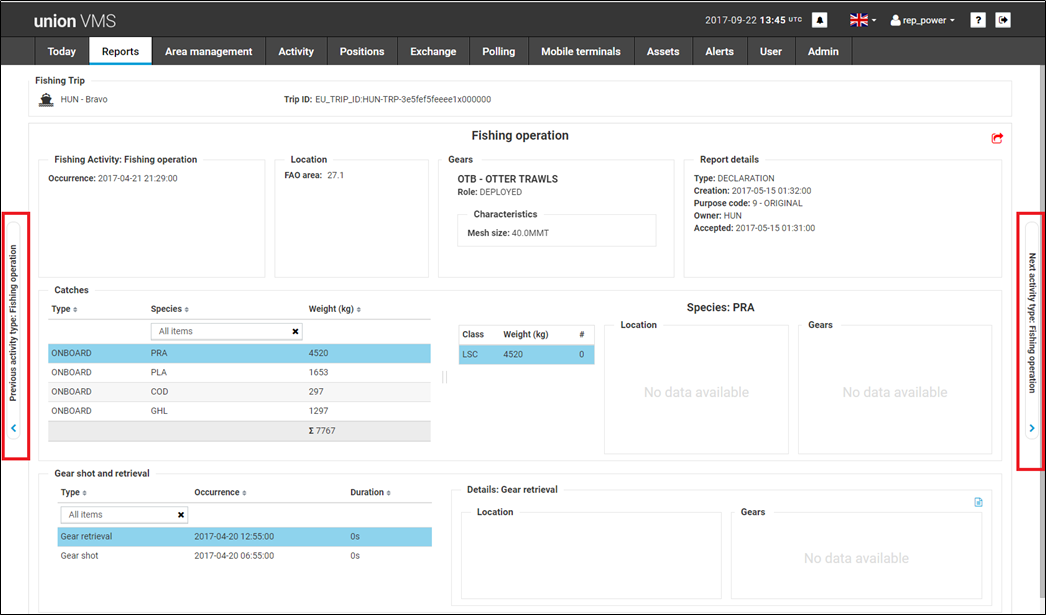
- click on the "eye" icon of Reports panel to view the selected fishing activity details.
- user can click on the navigator to navigate across the all the fishing activities in the current trip as shown below
Report List
This page displays all the accessible reports of the current user to search, update, run and delete existing reports and create new ones. 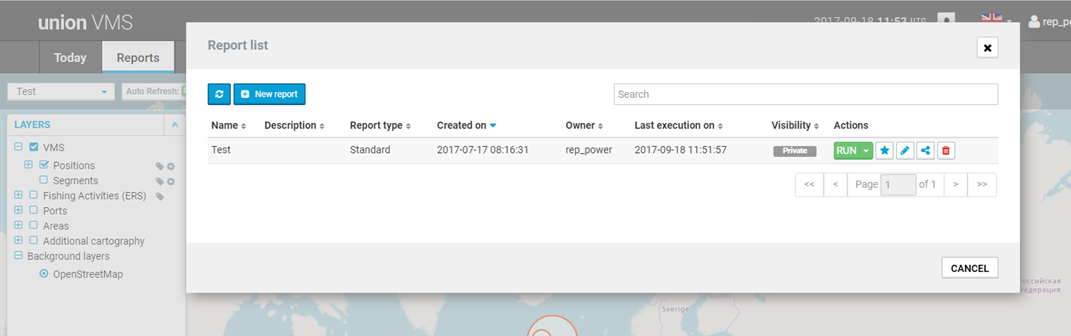
- Refresh – refreshes the report list
- Edit report – edits settings on report
- Delete report – removes the report
- New report – allow to create a new report
- Run report – runs the selected report and open it on live view like in the following picture:
Creating a New Report
There are two types of reports:
- Standard Reports
- Summary Reports
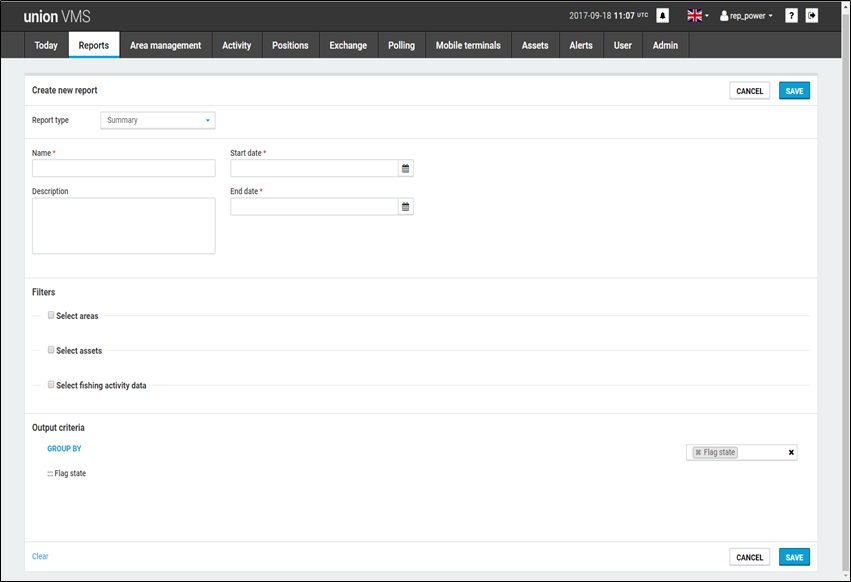
Standard Reports:
On this page the user can create a report and configure different filters. These filters will be applied to the result when the user runs the report. 
- click "save" button to create the new report
- click "clear" button to clear the all the fileds and the selected filters.
- click "cancel" button to cancel the report creation.
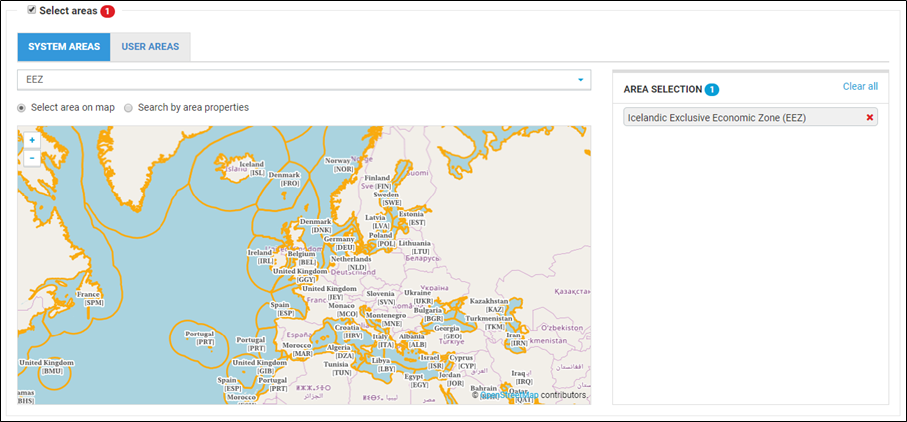
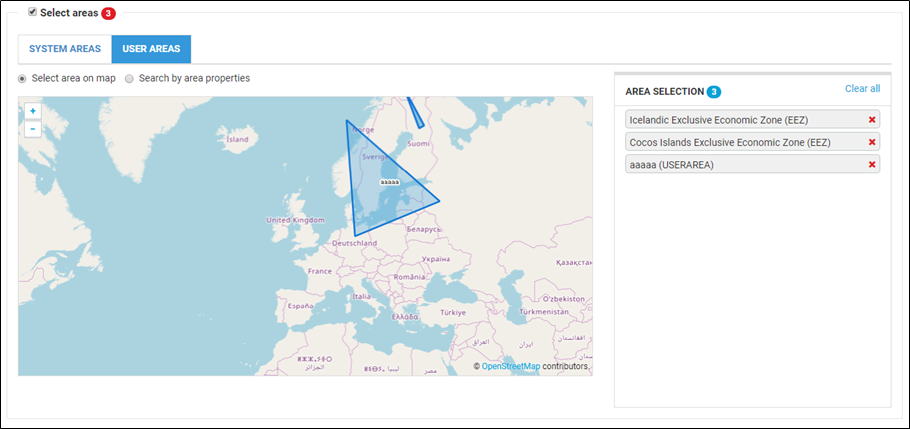
Areas Filters
Area There are two types of area filter. They are System areas and user areas.
- The area can be selected by "select area on map" or by "search by area properties".
- click on "tick" icon to add the area into area selection and also "Add all" is available to add all at once.
- "search" and "reset" options are available to search the areas and clear the selected search respectively.
An example of the areas filter is shown below:


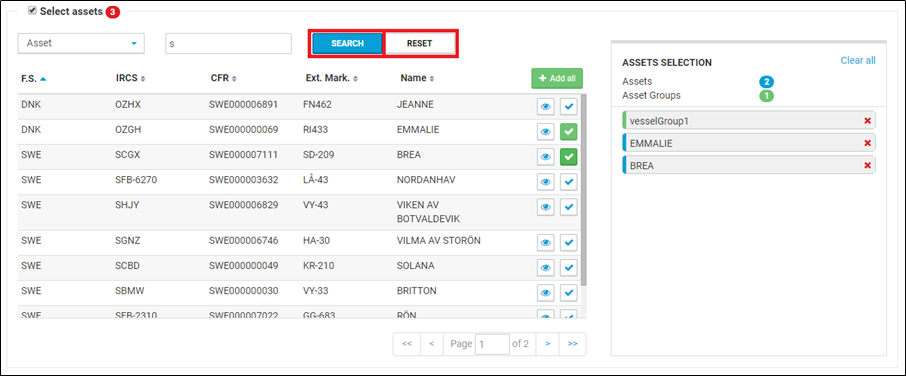
Assets Filter
Assets are selected either by selecting assets or asset group from the dropdown.
- click on "tick" icon to add the asset or assets group into assets selection and also "Add all" is available to add all at once.
- "clear all" button helps to clear all the selected assets from "assets selection".
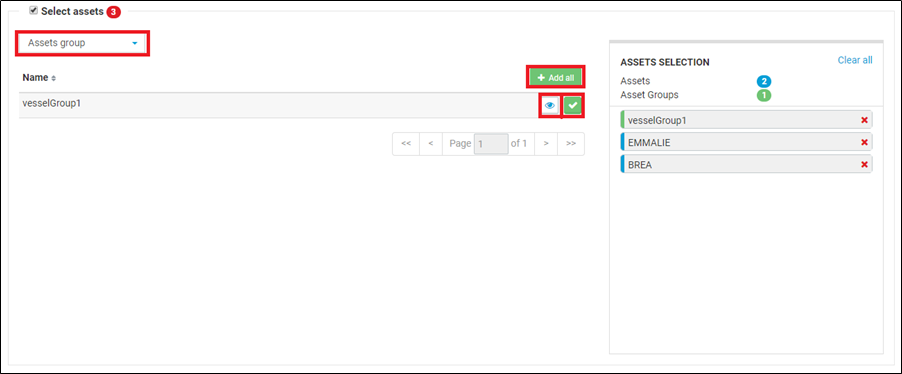
- For assets "search" option is available to search the assets and "reset" to clear the search .
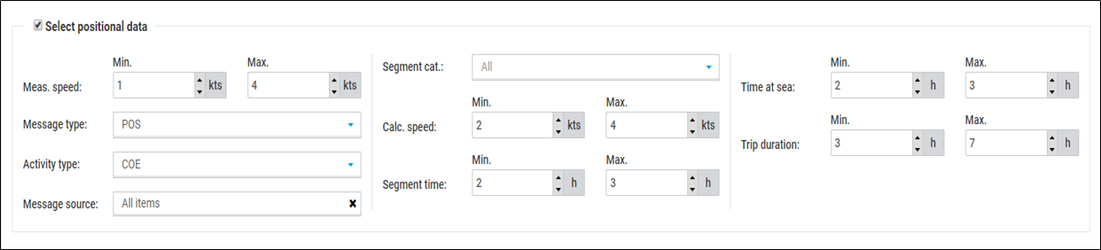
Positional Data Filter
Fill all the required fields as per the requirement. see the below example of positional data filter
Fishing Activity Data Filter
select all the required filters as per the requirement, see the below example of fishing activity data filter:

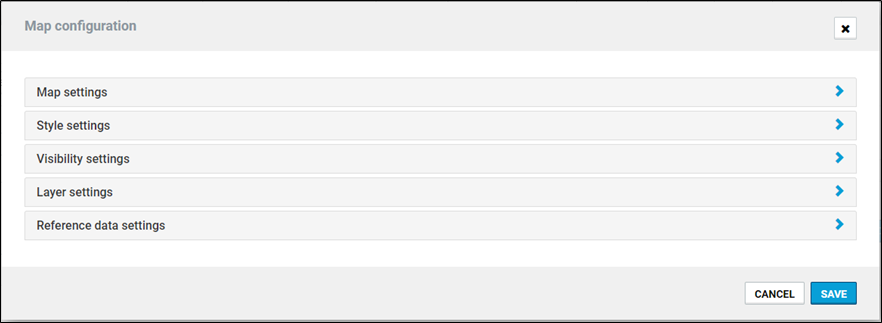
Map configurations
The following are the different map configurations available. See the picture below. click on the ">" icon to add different configuration settings.
Summary Reports:
On this page the user can create a report and configure different filters. These configurations will be applied to the result when the user runs the report.
- click "save" button to create the new report
- click "clear" button to clear the all the fileds and the selected filters.
- click "cancel" button to cancel the report creation.
Note: "select area", "select assets" and "select fishing activity data" are same as the filters of standard report. please refer the standard report for the detailed description.
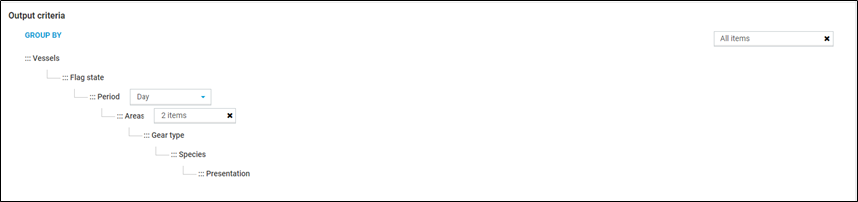
Output Criteria Filter
Filters can be added from the right side dropdown and then all the selected options are displayed in a tree structure.See illustration in picture below
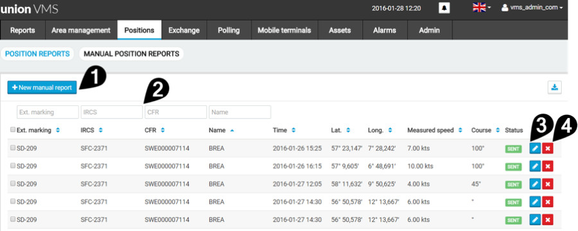
Section 6 Positions
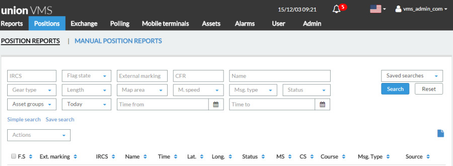
In order to find all incoming position reports, click on "Positions" in the main menu bar. The page will automatically update every minute. The Position reports are divided into "Positions Reports" and "Manual Reports".
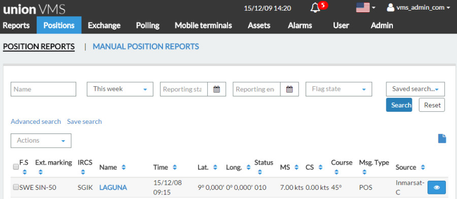
Position reports
Position reports show all incoming position reports listed in a table. It is possible to search through different search variables and sort functions.
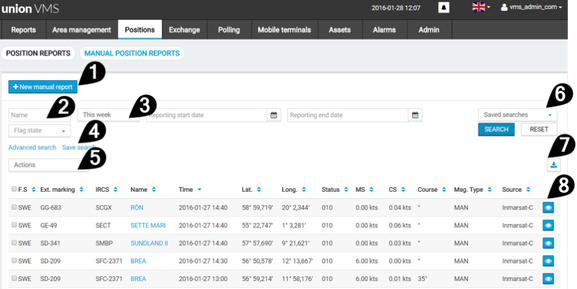
1 Create new manual report | 5 Actions dropdown list |
2 Search field | 6 Saved search dropdown list |
3 Set timeframe for search result | 7 Export data into CVS format |
4 Save search link | 8 View details |
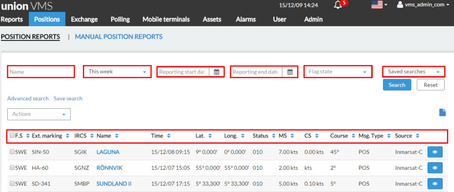
Search
- Searching through position reports can be done based on assert's external marking or name. Type in this in the text field "Name".
- Select what timeline the search should include from the alternatives in the drop down list.
- Select what flag stat the search should include from the alternatives in the drop down list.
- It is possible to sort the search result in descending order by clicking on the arrows in the result table. Se illustration in picture below.
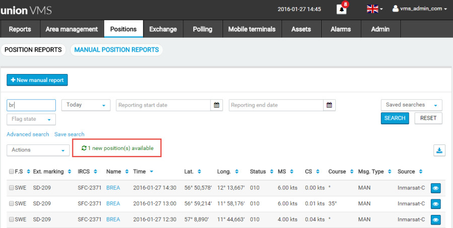
Search result
- Once the search has been performed, only incoming position reports that are relevant to that search will be displayed. The rest of the position reports will be gathered under an automatically updated ticker.
- Click on the ticker to reset to the latest list. See picture below.
Advanced search
- Advanced search presents a more range of flexible search criteria that can be used to sort through incoming position reports. Click on the link "Advanced search" to see the expanded search criteria.
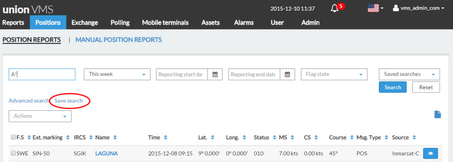
Save search
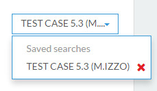
- It is possible to save searches. These are user specific and will appear under the dropdown list in "Saved Searches". See picture below.
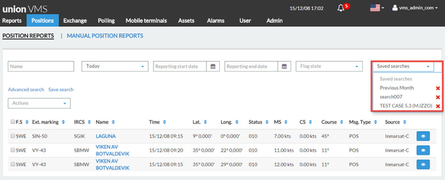
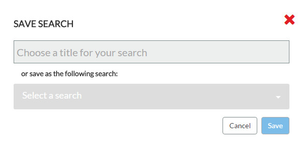
- To save a search, fill in all desired search fields and then click on the link "Save search". A pop-up window will appear.
- Choose a title for your search or replace it with an already existing saved search. Then click on the "Save" button.
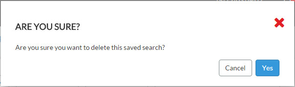
- Saved searches can also be removed by the cross icon to the right of the saved search name in the dropdown list.
Export position reports
The Export Selection creates a CSV file with the selected position reports' information.
- Click on "Export selection" in the "Actions" dropdown list. The CSV file will be downloaded to the computers "Downloaded files".
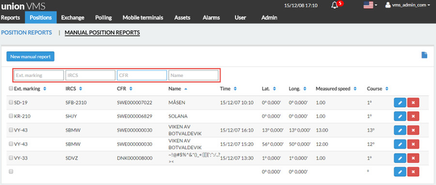
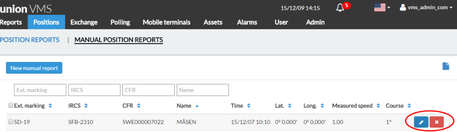
Manual position report
Click on "Manual Position Reports" under "Positions" in the main menu. Manual position reports show all the sent position reports as well as the drafts that have been saved locally. A manual position report can be created when an asset cannot report automatically.
1 Add new manual report | 3 View details |
2 Search fields | 4 Remove report |
Search for locally stored manual position reports
- To search through the manual position reports, fill in the available search fields and the results will be listed automatically.
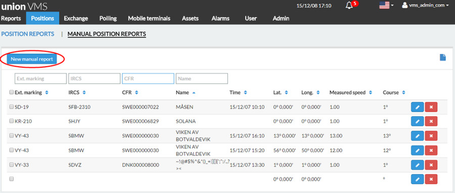
Create new manual position report
It is possible to create a new manual position report under the Manual Position Reports page.
- Click on the "New manual report" button under Manual positions reports, a pop-up window will appear.
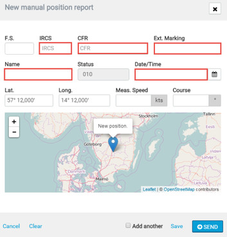
- Fill in all information fields.
- Once the asset name is filled in, its last position will be displayed on the map.
- Fill in date and time, please note that it need to be set previous to the current time.
- Fill in coordinates. The indicator will show on the map where those coordinates point to.
- Fill in measurement speed. Note that it cannot be set higher than 15knts.
- To add another new manual position report, click in the box "Add another" before click on the "Save" and "Send" button.
- To clear all content, click on the "Clear" link.
- To cancel and go back, click on the "Cancel" link.
- Click on the "Send" button to send the report. Note that all fields are mandatory and needs to be filled in for the report to be send. Before sending, a confirmation window will show. Review the report and click "Send" if approving it.
- There is also an option of saving without sending the report. Instead the report is saved locally under the workspace. To do that, click on the "Save" link.
- When a report is send, it disappears from the workspace and can only be found under incoming position reports.
Edit manual position reports
A saved report can be reopened and edit until it is send. It can also be deleted. However, as soon as the report is send it cannot be edited anymore.
- To edit a report, click on the edit symbol.
- To delete a report, click on the delete symbol.
Export manual position reports
The Export Selection creates a CSV file with the selected position reports' information.
- Click on "Export selection" in the "Actions" dropdown list. The CSV file will be downloaded to the computers "Downloaded files".
Section 7 Polling
In order to ask a mobile terminal located on an asset for information, click on "Polling" in the main menu bar. The page will show currently running program polls. The Polling tab is divided into "Polling logs" and "New poll".
Polling logs
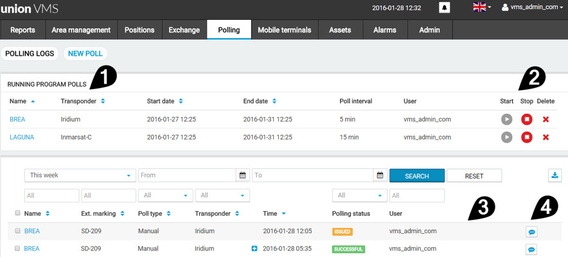
1 Running program polls | 3 List over polling logs |
2 Start and Stop running polls | 6 Notes |
New poll
Create a new poll in order to ask a mobile terminal for current updated information. Go to "New Poll" under "Polling" in the main menu.
Choose assets to poll
- Fill in all relevant fields to search for the asset to contact, then click on the "Search" button to continue.
- Choose among the search results, which asset to send a new poll to. Then click on the "Add" button, it will then turn green. Note that it is possible to send a new poll to all listed asset through the "Add all" button. See picture below.
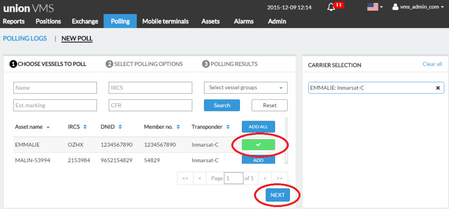
- When asset or assets is selected, click on the "Next" button to continue. See picture below.
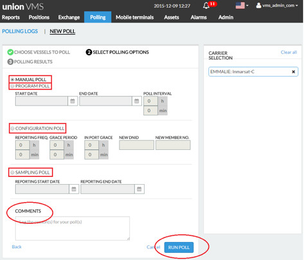
Select Polling options
- Choose between the following types of polling:
- Manual poll; Request position from asset once.
- Programmed poll; Enables to schedule for several manual polls.
- Configuration poll; Set new configuration settings to the mobile terminal.
- Samplings poll; Collect samples of assets internal reporting. Many reports are sent together at once, instead of distributed over several polls.
- When finished with the poll settings, click on the "Run poll" button or click on the "Cancel" button to cancel the new poll.
Polling results
- Once the poll is send, a feedback message shows for a few seconds confirming that. The poll result will be shown in in the Polling Logs.
Section 8 Alarms
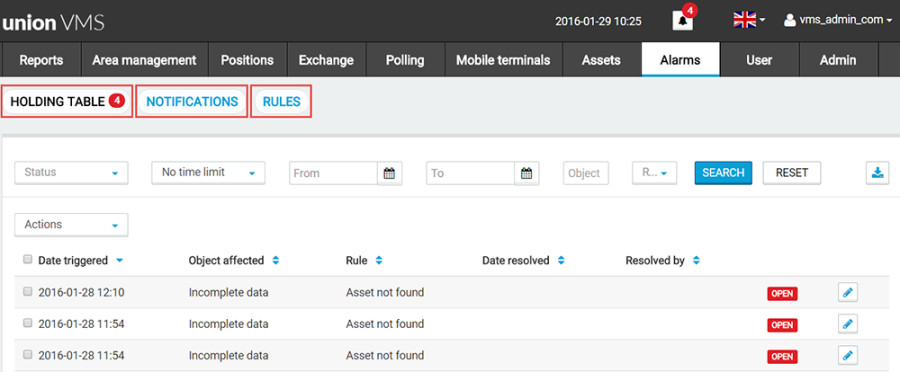
Click on "Alarms" in the main menu bar to see all active alarms or to set a new rule with demands for the system to track. The Alarms tab is divided into "Holding table", "Notifications" and "Rules".
The alarm system works as follow;
The "Rules" tab shows activated rules that the system is supposed to check that they are being correctly followed. It is also where settings for new rules are found. For more information, see "Rules" in this chapter.
"Holding table" lists registered rules that are put in quarantine since they are for some reason incomplete. For more information, see "Holding table" in this chapter.
"Notifications" shows the alarm reports from discrepancies from the active rules. For more information, see "Notifications" in this chapter.
For more specific information about each of these functions, see the following pages.
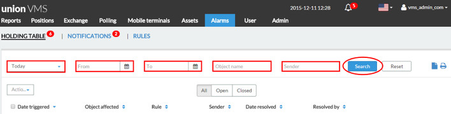
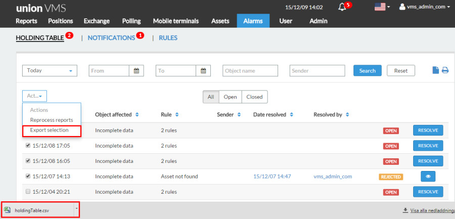
Holding Table
Holding table shows set rules that are automatically put in quarantine by the system since they in some way are incomplete.
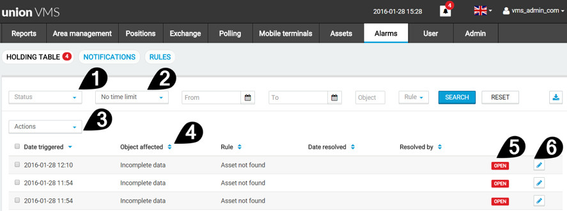
1 Time period from when to get data | 4 Holding table result list |
2 Set specific date and time | 5 Status |
3 Action dropdown list | 7 Resolve issue |
There is mainly one of three things making a rule incomplete and appearing in the Holding table;
- Incomplete data
- Asset not found
- Mobile terminals not found
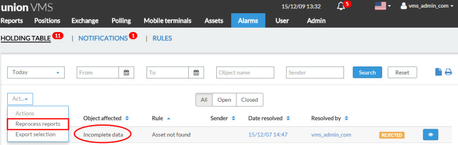
Incomplete data
The position report misses information.
Action:
- Reprocess the rule by selecting it in the Holding list and select the alternative "Reprocess reports" in the "Action" dropdown list. See picture below.
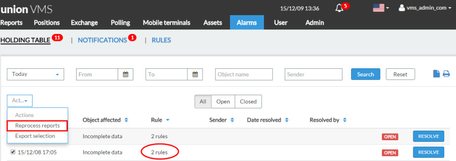
Asset not found
The position report cannot be matched against an asset.
Alternative actions;
- Reprocess the rule by selecting it in the Holding list and select the alternative "Reprocess reports" in the "Action" dropdown list. See picture below.
- Add a new assert to either a national database or a local placeholder. For more information of how to add a new assert, See section 3 Assets.
Mobile terminals not found
Alternative actions;
- Add a new mobile transfer in the national or in a local place holder. For more information of how to add a new one, see section 4 Mobile transformers.
- Reprocess the rule by selecting it in the Holding list and select the alternative "Reprocess reports" in the "Action" dropdown list. See picture below.
Searching the holding table
- It is possible to search in the Holding table by choose time period or set specific date and time in the search fields, then click on the "Search" button.
- It is also possible to search by typing name or sender, then click on the "Search" button.
Rules
Rules shows activated rules that the system is supposed to check so they are being correctly followed. It is also where settings for new rules are found.
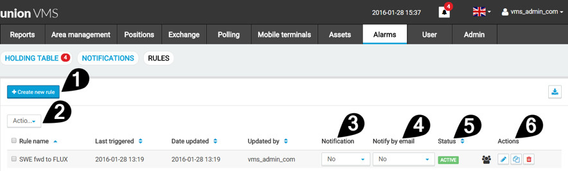
1 Create new rule button | 4 Text field for e-mail notification |
2 Action dropdown list | 5 Status Active/ Inactive rule |
3 Notification setting | 6 Edit, Duplicate, Delete |
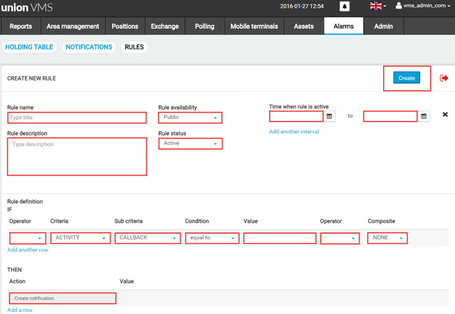
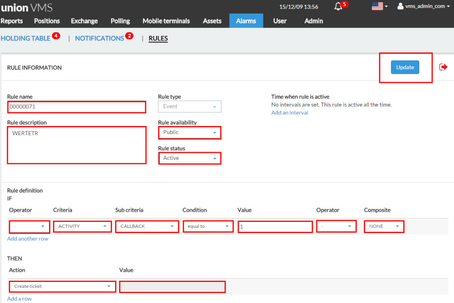
Create new rule
- Click on the "Create new rule" button to open the settings for creating a new rule.
- Fill in a rule name and a description for what the rule is regarding.
- Fill in rule availability, if it should it be a;
- private rule for only the user to see,
- public rule for other users to be able to subscribe to or,
- global rule that generates notifications to all users in the organization. Note that this global rule alternative is only for Admin users.
- Fill in rule status, if the rule should be active or inactive.
- It is possible to set a time interval for when the rule should be active. Choose date and time by using the calendar. Click on the link "add another interval" for more.
- Fill in the rule definition. It is possible to use several rows in order to set the desirable rule and action. Form the rule definition by using following parameters:
- Operator; operators should be used only when building sets of conditions which the user would like to result in the same actions taken by the system.
- Criteria; a set of all available variables that can be used to validate, get notified or forward incoming position reports. E.g. Assets, Asset groups, Mobile terminals, Position reports, etc.
- Sub criteria; this list changes after chosen criteria to further specify attributes that can be used in building the rule. E.g. Asset CFR, Mobile terminal DNID, Position report time, etc.
- Condition; decides the check you would like to do. E.g. an Asset CFR is equal to, an position report is in an area, etc.
- Value; specifies exact value for the rule's condition. E.g. an Asset CFR is "SWE000011111".
- Composite; this can be used to compose a complex rule between two conditions. E.g. if the user would like to get notified if asset CFR is equal to "SWE00000111" OR if area code is equal to "SWE".
- Fill in what action the system should take if the rule is broken. It is possible to add several different actions, click on the "Add a row" link.
- When finished with the rule, click in the "Create" button to save.
Edit rule
When edit an already existing rule, click on the "View Details" button to open up a new window with the rule information.
- Change settings in the different rule options available, and then click on the "Update" to save the new settings.
- Click on the "Close" button to cancel and go back.
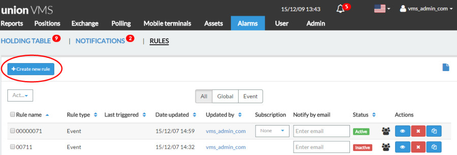
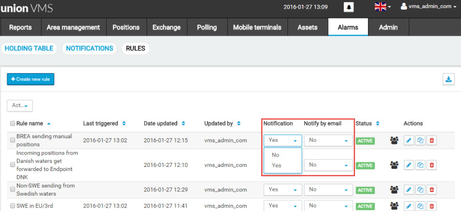
Subscribe on rule
It is possible to subscribe on rules in order to get notification regarding them.
- Select what rule to subscribe to, click on "Notification" in the dropdown list in the column named "Subscription". See picture below.
- There is also an option to be notified by email. Fill in preferred email address in the text field in the column "Notify by email. See picture below.
Export rule
- To export a list of rules, select one or several rules to export by click on the box in the "Rule name" column.
- Select "Export selection" in the "Actions" dropdown list.
- The file will be downloaded to the computers "Downloaded files".
Notifications
In notifications shows the alarm reports from discrepancies in the active rules. There are search fields in order to enable the user to find older notifications as well as new ones.
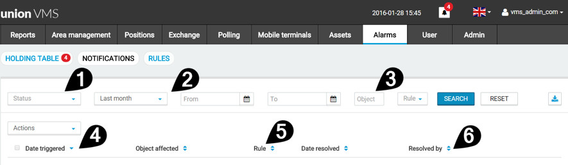
1 Alarm status | 4 Date the alarm was triggered |
2 Set specific date and time | 5 Rule the alarm is based on |
3 Object | 6 Resolve notification |
Search and sort among notifications
- Fill in search field to find the specific notification(s).
- The notifications can also be sorted by "All", "Open" and "Closed" notification.
Close notification
- The user can choose to resolve an open notification by clicking on the "Close" button, see picture below.
Section 9 Exchange
Click on "Exchange" in the main menu bar to get an overview of all incoming and outgoing in the system. Exchange is working as the systems communication channel.
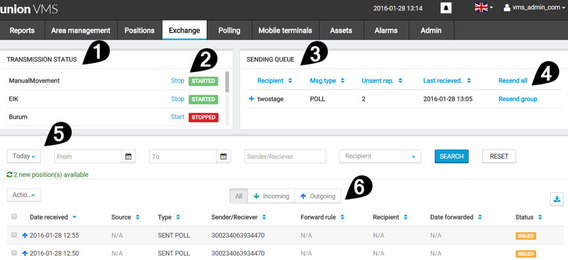
1 Transmission status | 4 Manually resend messages |
2 Stop and start transmissions | 5 Search fields |
3 Sending queue | 6 Sort on All, Incoming, Outgoing. |
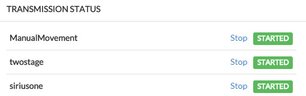
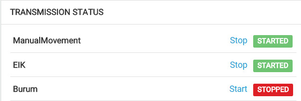
Transmission status
The transmission status list shows all communication plugins.
The user can start and stop transmissions here.
The sender name is shown to the left and the transmission status is shown to the right. See picture below.
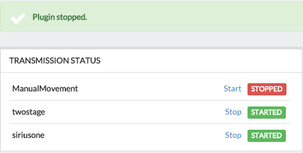
Stop plugin
- To stop a plugin, clink on the stop link.
- A feedback message will show for a few seconds, confirming that the plugin is stopped.
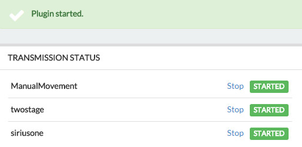
Start plugin
- To start a plugin, clink on the start link.
- A feedback message will show for a few seconds, confirming that the plugin is stopped.
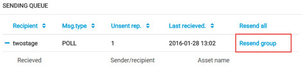
Sending queue
The sending queue is showing all outgoing messages that have not been send properly and ended up in a queue.
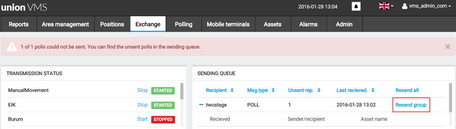
In order for the messages to be sent, check that all plugins are running in "Transmission status". If they are not, set the transmission status to "Started".
The system will automatically try to resend the messages in the sending queue, but it is also possible to do it manually. Click on the "Resend group" link illustrated in the picture below.
Section 10 Area Management
In Area management is user defined zones to save specified.
| Note that this section is still under construction and will be updated in a later version. |
My Areas
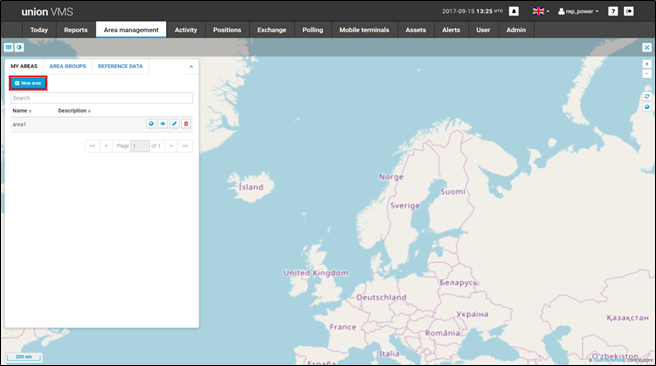
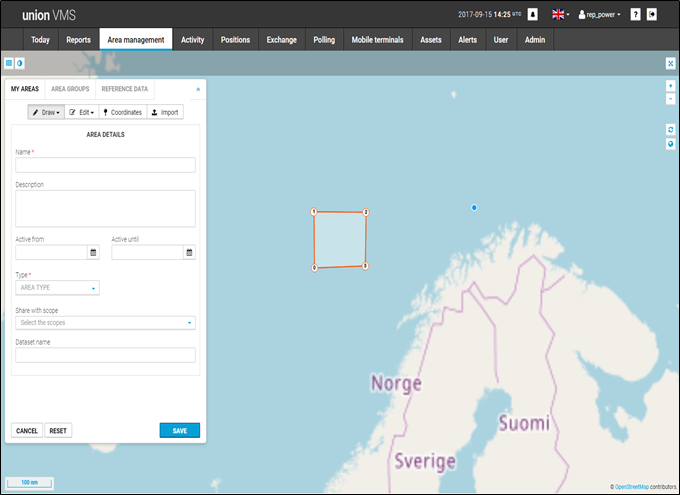
Create new area
- To create a new area, click on "New area" button.
- Choose to specify the area using one of the tools:
- Draw; Use the mouse pointer to draw up an area on the map. Click on the map and drag to another point to mark the area.
- Coordinates; Fill in the coordinates for the area to mark.
- Import; Upload a file to specify the area.
- Fill all information in the text fields and then click on the "Save" button.
Draw
- Click on "New area" and click on the "Draw" tab.
- Use the mouse pointer and click on the map to mark the area. Then proceed by click on the next point and then the next point again until the entire area is selected.
- Press on enter or tie the ends together to end the drawing.
If the area is drawn on the map, the coordinates will be automatically filled in.
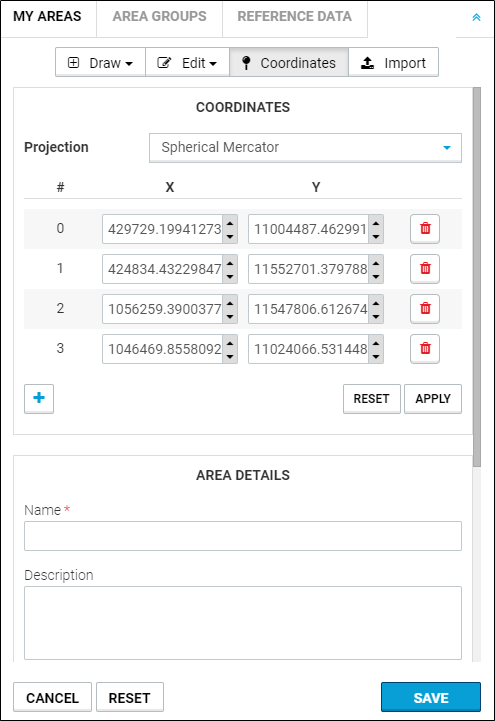
Coordinates
- To specify area by coordinates, click on the "Coordinates" tab.
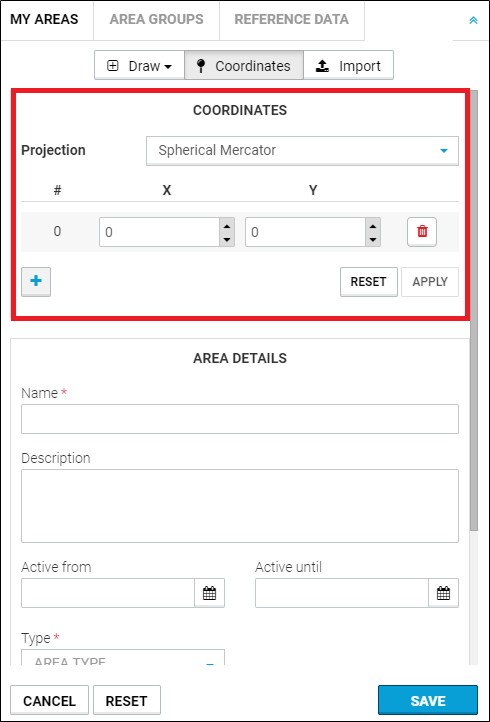
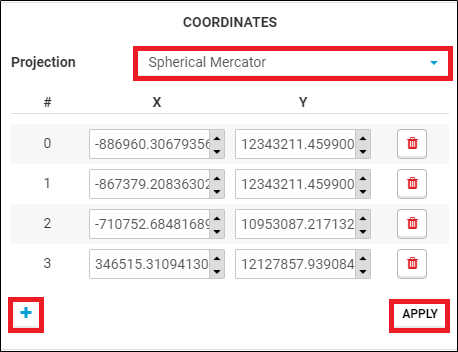
- Choose what projection in the dropdown list and then fill in the coordinates in the text fields.
- It is possible to add several rows to specify an exactly area, click on the "+" button to add more rows.
- Press the "Reset" button the clear the form.
- To save the coordinates press the "Apply" button.
Import
- Click on "New area".
- Choose the "Import" tab.
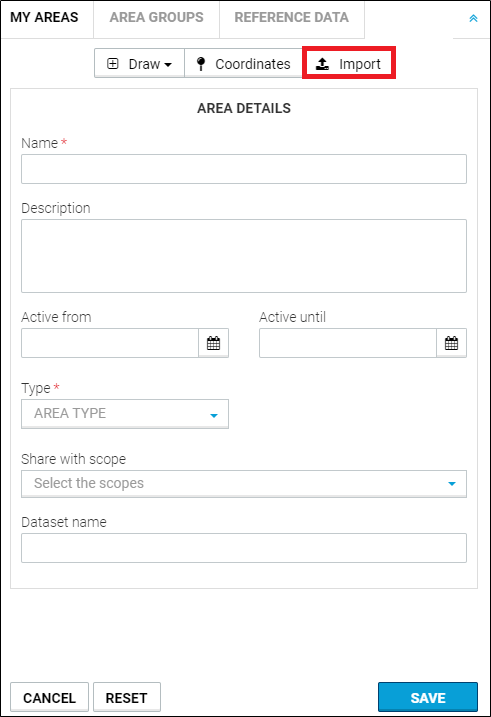
- A pop up window will show. Choose File format, Projection and Delimiter in the drop down lists. See picture below.
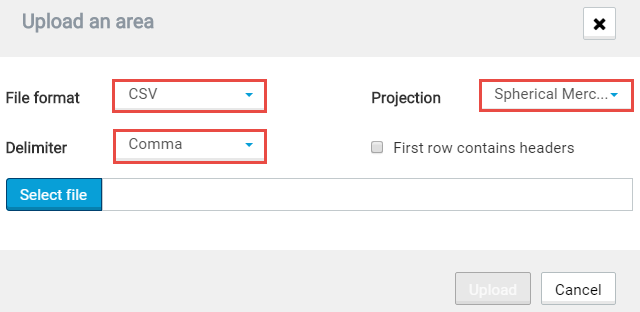
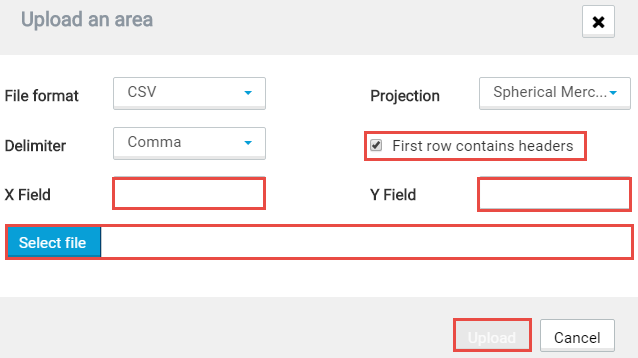
- Choose however the first row should contain headers or not. See picture below.
- If it should, fill in the text fields illustrated in the picture below.
- Finally select what file to upload from the computer and click on the "Upload" button.
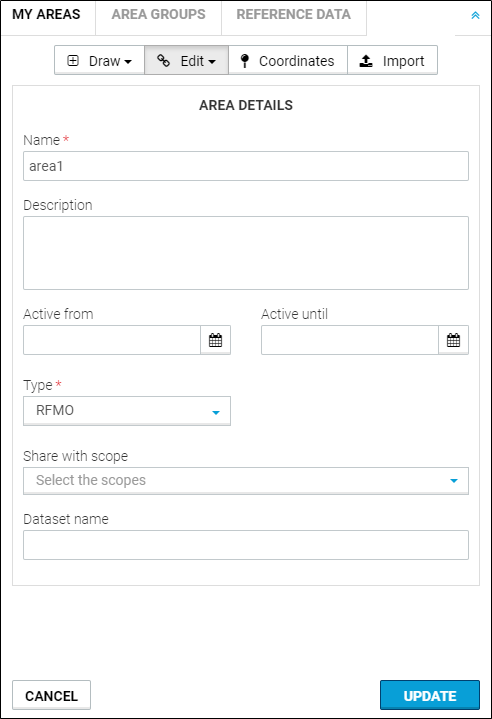
Editing existing areas
To edit an already saved area, click on "Edit existing area" illustrated in the picture below.
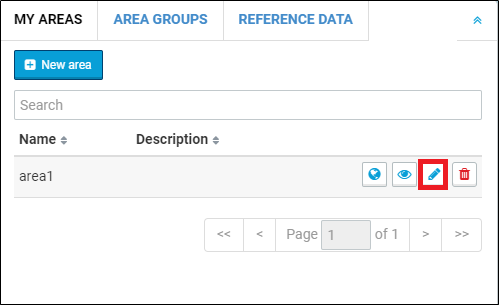
Now perform the changes and click on the "Update" button to finish.
Reference Data:
select "Data type" from the drop down.
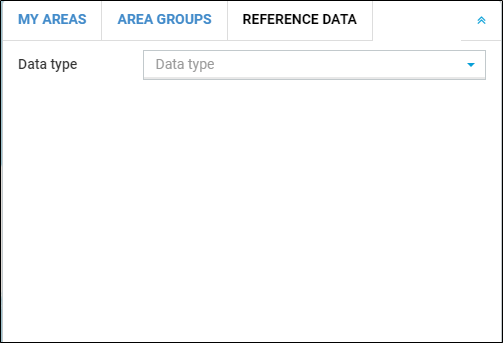
Now, there are three options which are as follows
- Upload new area data
- Update metadata
- Create Dataset
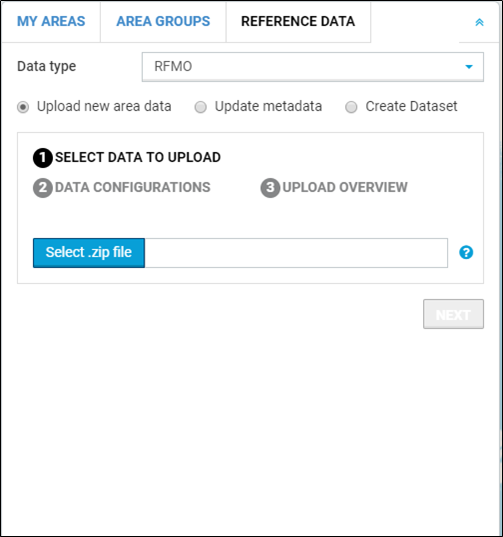
To "Upload new area data", follow the below steps:

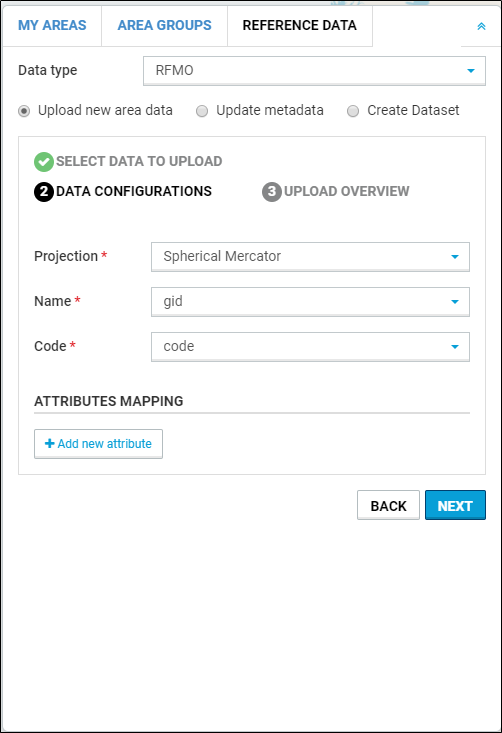
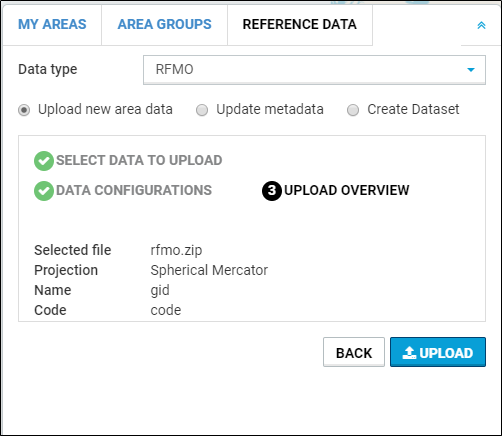
Now, click on the "upload" button. The following message is displayed if the upload is successful

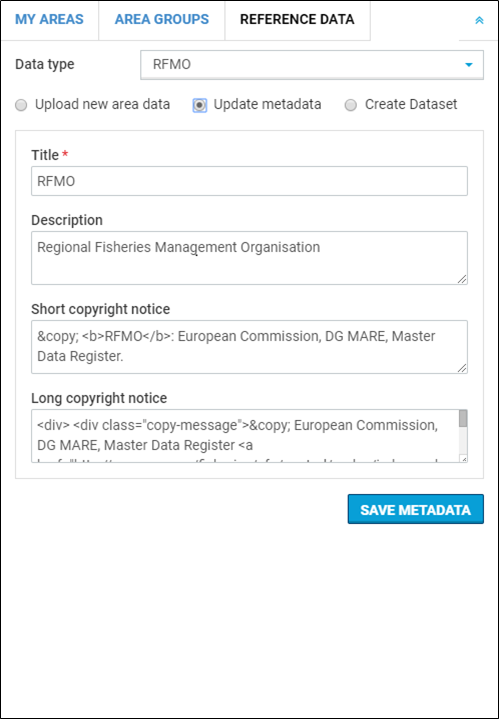
- To "Update metadata", update the fields and click on the "SAVE METADATA" button :
- To "create Dataset" :
The dataset can be created either by "select area on map" or by "search by area properties".
- The dataset creation by "select area on map", as shown below.
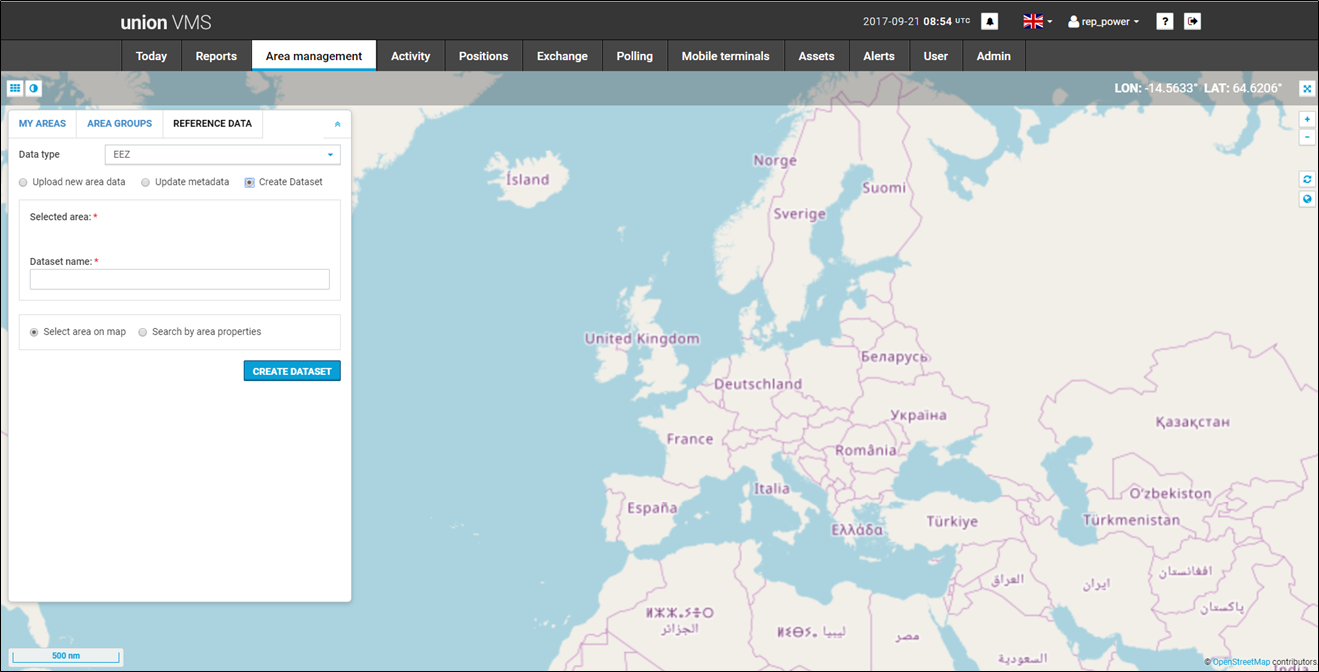
select the area on the map, automatically the name of the selcted area is displayed under "selected area" as shown below
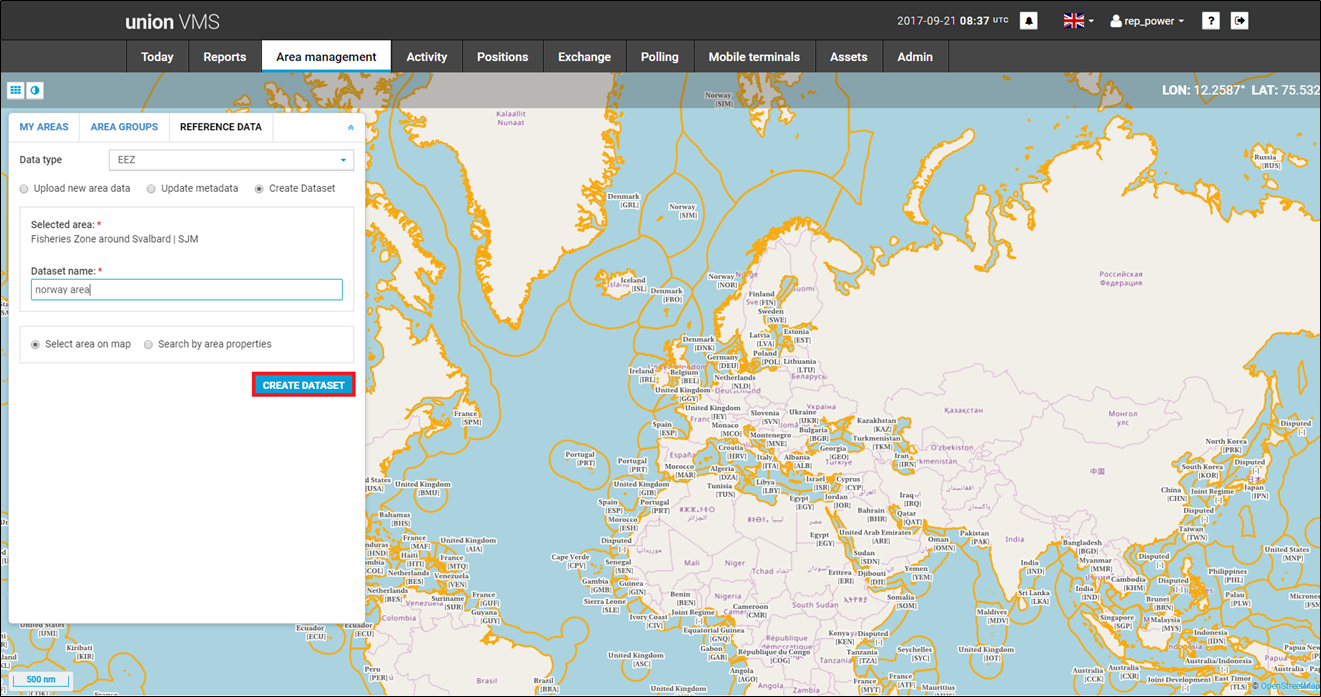
Now, name the dataset and click on the "create dataset" button. A new dataset is created and an alert is displayed if the dataset creation is succesful or not.

- The dataset creation by "search by area properties", as shown below.
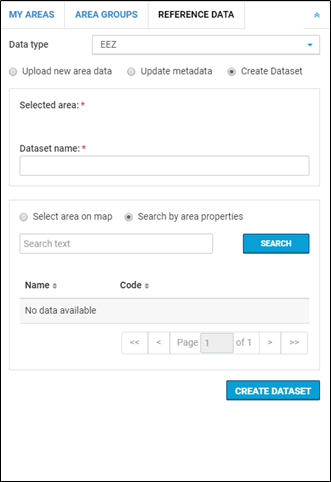
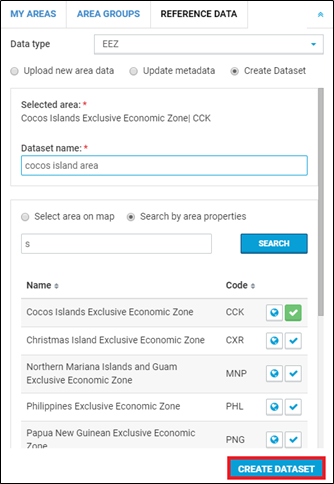
click on the "create dataset" button to create the dataset. An alert is displayed showing whether the dataset was created successful or not.
Area Groups
select the "Area Groups" tab
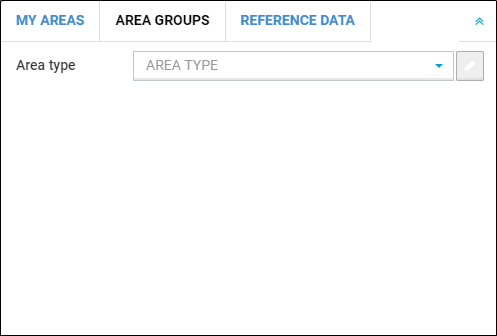
Now, select "Area Type" from the drop down then
- "Edit" button is enabled.
- List of areas are displayed.
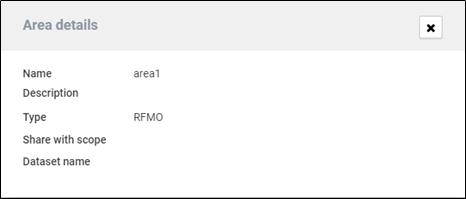
- Click on "Details" icon to view the details.
- Click on the "Globe" icon to zoom to the area selected area.
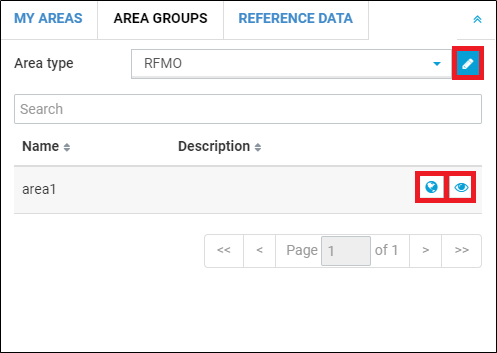
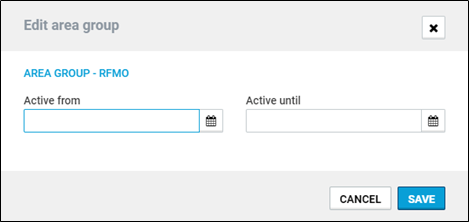
click on the "Edit" button to edit the area group as shown below:
click on "Details" icon to view the details as shown below:
Section 11 User management
This section is a basic user guide for the USM (User Security Management) application v1.7.1, called the User (Management) module when integrated under U-VMS. Operations that can be performed in the user web interface are described in this section.

The main roles of USM cover the user authentication, user authorisation and the management of user data and related data. More precisely:
- to store data about users that might have access to applications, their access rights and information about organisations;
- to authenticate users;
- to verify or disseminate the user access rights;
- to disseminate information about organisations
Profile: Normal User
This list of actions may be triggered by any user of the U-VMS application.
How to change my security answers
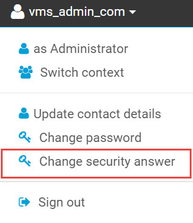
Option 'Change security answers' from the user contextual menu:
A pop-up displays a list of questions and answers (mandatory fields are marked with a red '*'):
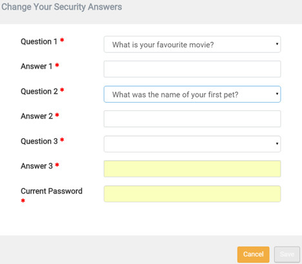
When activated for the first time, the list is empty. The user must choose a question in a list of predefined questions and provide an answer. The number of questions to be replied by the user is a parameter of the system (cfr Policies).
If it is not the first time, the list is filled with the previous answers of the user. The user may modify the reply and/or to change the question.
The system verifies that a question has not been selected more than once and that an answer has a minimum of three characters.
This list of security questions is used when the user has forgotten his password (cfr How to request a password).
How to update my personal data
Option 'Update contact details' from the user contextual menu (mandatory fields are marked by a '*'):

A pop-up displays the following user information that may be modified (mandatory fields are marked with a red '*'):
- Phone number
- Mobile number
- Fax number
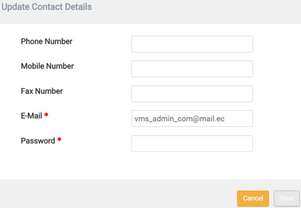
The "Password" field is not used to modify the password. It is a security channel to confirm the identity of the user. The 'save' button to commit changes is only active when the password has been filled in.
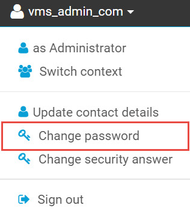
How to change my password
Option 'Change password' from the user contextual menu:
A pop-up appears where the user must enter the current password and two times the new one (mandatory fields are marked with a red '*'):

Depending on the password policies put in place in the system (cfr Policies), the system performs some controls based on: a minimum length, minimum number of digits, minimum number of special characters (!""£$%^&'*(),./:@~<>+=-#), recent occurrence in the password history…
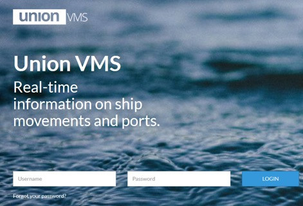
How to request a password
Two cases are possible:
- The first time: the user must follow the procedure put in place by the organisation for such case. If there is no official procedure, the administrator of the system must be contacted.
- Forgotten password: In the login screen, the option 'Forgot your password?' can be activated:
A pop-up is displayed to request the username (mandatory fields are marked with a red '*'):
Therefore, two cases are possible:
- The user has already filled-in the security questions (cfr How to change my security answers): if so, the security question panel is displayed with the set of questions chosen by the user. The user must enter the answers and two times a new password. If no problem is detected (i.e. the answers are correct and the new password respects the password policies (cfr How to change my password), a successful message is displayed. The user can enter in the log in screen again with the new password.
- The user has no security questions (cfr How to change my security answers): the email address of the user registered in the system is used to send him an email with a temporary password. At first log in, the user must change it.
Example of email sent by the system:
Here is your new password:
u2y#rNs*T8
Please login and change it.
How to know my different profiles
Option 'Switch context' from the user contextual menu:
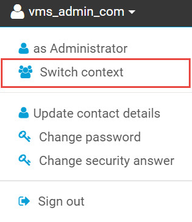
The list of contexts (role and scope) attached to the user is displayed:
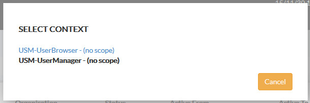
The user may choose any context during his session. Depending on the selected context (and the permissions contained in), the web interface is automatically adapted to see only the options that the user may use.
How to log out from the system
Option 'Sign out' from the user contextual menu:

Profile: Administrator
This list of actions may be triggered by a user with special rights on the USM system.
How to find back User information & Access Rights
User information is accessible through the 'USERS' option from the main menu:
![]()
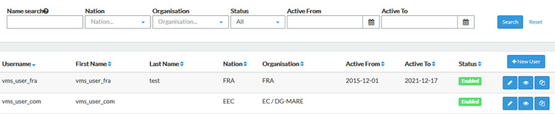
The web screen provides a set of filters to find back the users:
- Name search: a set of characters can be provided. The search is performed on the Username, First Name and Last Name. The position of the characters entered for the search in the data is not important;
- Nation: a selection of one entry in the list of countries registered in the system;
- Organisation: a selection of one entry in the list of organisations managed by the system;
- Status: a selection of one entry in the list of user statuses defined in the system;
- Active from: date from which users can be active in the system;
- Active to: date until when users can be active in the system
The result of the search is displayed below the set of filters:

When there is no data corresponding to the search criteria, the message 'No result found.' is displayed.
![]() If the search is successful, the list of users matching the criteria is displayed. For each user, the icon gives access to detailed user information in three tabs:
If the search is successful, the list of users matching the criteria is displayed. For each user, the icon gives access to detailed user information in three tabs:
- Contact and Status Details: user information;
- Contexts: user rights (see context definition);
- Preferences: user preferences;
How to change a User password
| Note that this feature is not possible through USM if the system use an Identity Management (IDM) system. |
If so, the management of passwords must be done in that system and the corresponding option(s) in USM are not active.
If the management of passwords is delegated to USM, the following actions should be done:
- To find back the user: cfr How to find back User information
- For that user, to select the option for detailed user information. In the web screen, the option 'Set Password' is visible.
- The administrator may enter twice a new password for the user.
The communication of that new password to the user is not covered by the system.

How to create a User
The following actions should be done:
- To select the option 'USERS' in the main menu
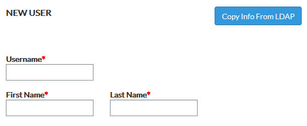
- In the web screen, the option 'New User' is visible:

There are two ways of creating a user depending on the technical environment in place:
- Using a IDM
The user interface allows a USM Administrator to pull (copy) information from an external Identity Management (IDM) system (e.g. LDAP, Active Directory) to complete the user information stored in USM.
With an IDM, some user information (depending on how USM is interfaced with: cfr the USM Admin guide & USM IDM setup guide) will be copied into USM. When imported, such information should not be updated anymore because the official source is considered to be the IDM. (a next version of USM will prevent that action)
The procedure is the following: the username must be inserted first. Then the option 'Copy Info From LDAP' is triggered. User information from the LDAP is copied in USM if the username entered in the web screen matches an existing username in the IDM. If not, an error message 'User not found' is displayed.
Some other user information needs to be filled in before finally saving the data (cfr next point).
- Using USM as source for all user data
The following data should be provided (mandatory fields are marked by a red '*'):
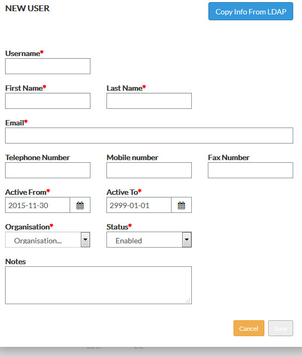
- Username: it must be unique. If not , an error 'User already exists' is generated when saving data;
- First name
- Last name
- Email: it must contain a '@' to be valid;
- Telephone number
- Mobile number
- Fax number
- Active from
- Active to
- Organisation: only the 'enable' organisation are proposed (cfr Organisation management)
- Status:
- Enabled: the user is active. It is the default value.
- Disabled: the user is no more active. He may not log-in in any UVMS module.
- Locked: the user may not log-in in any UVMS module. This status is mainly managed by the system when the user access should be (temporarily) deactivated due to a violation of a security policy (wrong password entered multiple times …) cfr Policies management.
- A note
When data is saved, the user has still no password and no access right. Please see the corresponding entries in this document to complete the process.
How to give access rights to a User
The first action is to find back the user: cfr How to find back User information.
Then, two options are possible:
1. To clone an existing user profile
![]() In such a case, all access rights (more precisely the contexts) from another user will be copied to this user. To do so, the action is triggered by clicking on the following icon at the level of the user entry in the user panel:
In such a case, all access rights (more precisely the contexts) from another user will be copied to this user. To do so, the action is triggered by clicking on the following icon at the level of the user entry in the user panel:
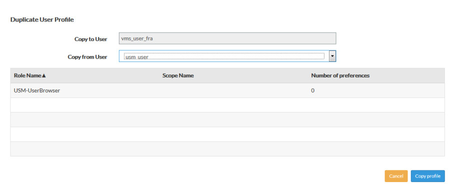
A pop-up is displayed where the administrator can pick-up a reference user from whom the contexts (role/scope/preferences) must be copied to the user. All the contexts of the reference user are displayed for information. When the 'Copy profile' option is triggered, a message indicates that any previous access rights of the user receiving the new profile will be deleted.
The new profile of the user can be later extended (cfr next option).
2. To create or change contexts
![]() To do so, the action is triggered by clicking on the following icon at the level of the user entry in the user panel:
To do so, the action is triggered by clicking on the following icon at the level of the user entry in the user panel:
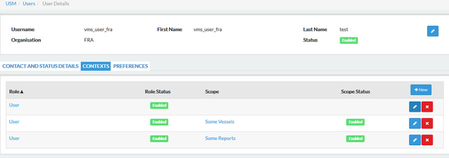
In the 'Contexts' tab, the permissions (if any) of the user are available:
A new context can be added to the profile of the user with the 'New' option:
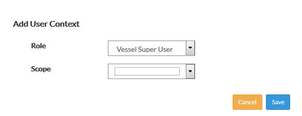
A pop-up is displayed where the administrator must choose a role and optionally a scope:
![]() The system verifies if the context (role/scope) does not exist already for the user. If not, the profile of the user is modified. If the user is connected in U-VMS when the operation is performed, the impacts (new permissions …) will only take place at the next user session.
The system verifies if the context (role/scope) does not exist already for the user. If not, the profile of the user is modified. If the user is connected in U-VMS when the operation is performed, the impacts (new permissions …) will only take place at the next user session.
The same screen is proposed when updating a context with the icon:
![]()
Deletion of a context is also possible with the icon:
By clicking on the existing roles or scopes, the corresponding screens to view the content ( permissions or datasets) are displayed with options to manage them. It should be noted that in such case, the modifications done on a role or a scope affect all users having the element in their context(s) (Cfr How to manage Roles and How to manage Scopes).
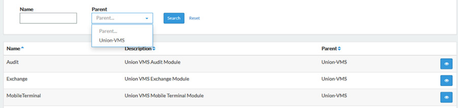
How to manage Organisations and related information
The option 'Organisations' in the main menu is the entry point:
![]()
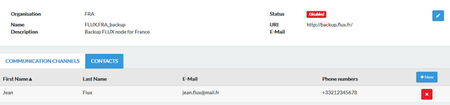
An organisation may provide technical information for one or multiple endpoints. Each endpoint may have one or more communication channels and a list of contact people.
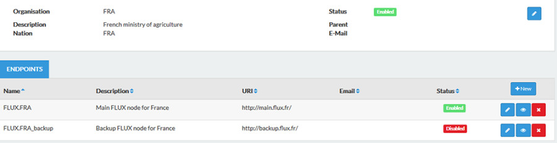
Organisation
The web screen provides a set of filters to find back an existing organisation:

- Name search: a selection of one entry in the list of organisations created in the system;
- Nation: a selection of one entry in the list of countries proposed by the system;
- Status: a selection of one entry in the list of organisation statuses defined in the system;
The result of the search is displayed below the set of filters.
When there is no data corresponding to the search criteria, the message 'No result found.' is displayed.
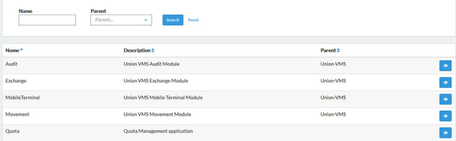
![]() If the search is successful, the list of organisations matching the criteria is displayed. For each entry in that list, the following actions are available:
If the search is successful, the list of organisations matching the criteria is displayed. For each entry in that list, the following actions are available:
The creation of an organisation is done by selection the 'New' option:
![]() The edition of an organisation is done with the icon closed to the organisation entry in the organisation panel:
The edition of an organisation is done with the icon closed to the organisation entry in the organisation panel:
For both options, the following pop-up is presented: (mandatory fields marked with a red '*'):

- Name
- Description
- Nation: to select one entry in the predefined list of countries
- Status:
- Enabled: by default.
- Disabled: with that status, the organisation cannot be selected anymore when creating/updating user information.
- Parent: a hierarchy of organisations can be registered. It can be used for defining a service under a certain department or a local organisation linked to an international headquarter.
![]() The deletion of an organisation is done by the icon closed to the organisation entry in the organisation panel:
The deletion of an organisation is done by the icon closed to the organisation entry in the organisation panel:
A deletion is only possible if there is no user belonging to that organisation. In case of deletion, all endpoints and communication channels associated with the organisation are deleted as well.
Endpoints
![]() The additional information attached to an organisation is visible when selecting the icon closed to the organisation entry in the organisation panel:
The additional information attached to an organisation is visible when selecting the icon closed to the organisation entry in the organisation panel:
![]() The creation of an endpoint of an organisation is done by selection the 'New' option:
The creation of an endpoint of an organisation is done by selection the 'New' option:
![]() The edition of an endpoint is done with the icon closed to the endpoint entry in the endpoint panel:
The edition of an endpoint is done with the icon closed to the endpoint entry in the endpoint panel:
For both options, the following pop-up is presented: (mandatory fields marked with a red '*'):
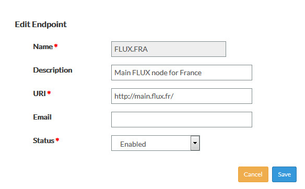
- Name
- Description
- URI: Uniform Resource Identifier of the endpoint
- Status:
- Enabled: by default.
- Disabled: means that the endpoint cannot be used for electronic exchanges.
![]() The deletion of an endpoint is done by the icon closed to the endpoint entry in the endpoint panel:
The deletion of an endpoint is done by the icon closed to the endpoint entry in the endpoint panel:
In case of deletion, all communication channels associated with the endpoint are deleted as well.
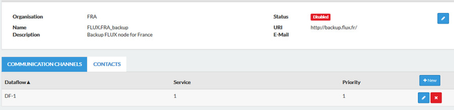
Communication Channel
![]() The additional information attached to an endpoint is visible when selecting the icon closed to the endpoint entry in the endpoint panel:
The additional information attached to an endpoint is visible when selecting the icon closed to the endpoint entry in the endpoint panel:
![]() The creation of a communication channel of an endpoint is done by selection the 'New' option:
The creation of a communication channel of an endpoint is done by selection the 'New' option:
![]() The edition of communication channel is done with the icon closed to the entry in the communication channel panel:
The edition of communication channel is done with the icon closed to the entry in the communication channel panel:
For both options, the following pop-up is presented: (mandatory fields marked with a red '*'):
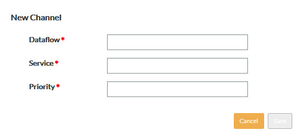
- Dataflow : name of the dataflow
- Service: service transiting through the dataflow
- Priority : value depending on the organisation policy for managing channels
![]() The deletion of an organisation is done by the icon closed to the organisation entry in the organisation panel:
The deletion of an organisation is done by the icon closed to the organisation entry in the organisation panel:
Endpoint contacts
The web screen showing the detailed information of an endpoint is made of two tabs. The second tab is about contacts.
The contact panel shows (if any) all the contact points of an endpoint:
![]()
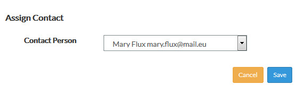
A new contact can be associated with an endpoint by selecting the 'New' option:
A pop-up shows the list of all existing users with their first/last names and the email address. A selection of an entry creates a contact point:
![]() A contact point can be deleted by selecting the icon closed to the contact entry in the contact panel:
A contact point can be deleted by selecting the icon closed to the contact entry in the contact panel:
In such case, only the reference to the user (contact role) is deleted, not the user itself.
How to manage Policies
Policies are accessible through the 'Policies' option from the main menu:
![]()
The web screen provides a set of filters to find back the information:

- Name search: A set of characters can be provided. The search is performed on the policy names. The position in the data of the characters entered for the search is not important;
- Subject: a selection of an entry in a list of predefined subjects used to classify the policies;
The result of the search is displayed below the set of filters.
When there is no data corresponding to the search criteria, the message 'No results found.' is displayed.
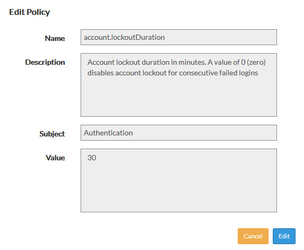
If the search is successful, the list of policies matching the criteria is displayed. For each policy, the following data is available:
- Name
- Description
- Subject: used to classify the policy
- Value: cfr USM Admin guide
A policy can be modified by clicking on the icon closed to the entry in the policies panel.
A pop-up is displayed where the description and the value can be modified. A definition of each policy and information about possible values are given in the USM Admin guide:
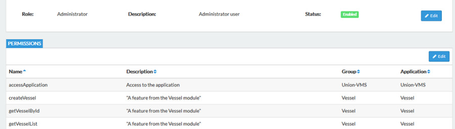
How to manage Roles
Information about roles is accessible through the 'Roles' option from the main menu. See picture below.
![]()
The web screen provides a set of filters to find back the roles:

- Role search: A set of characters can be provided. The search is performed on the role name. The position of the characters in the name is not important;
- Application: selection of an entry in the list of applications linked with USM;
- Status:
- Enabled: valid/active role with a set of permissions
- Disabled: inactive role
The result of the search is displayed below the set of filters.
When there is no data corresponding to the search criteria, the message 'No result found.' is displayed.
If the search is successful, the list of roles matching the criteria is displayed with the following information:
- Name:
- Description
- Status: enabled/disabled
The creation of a role is done by selection the 'New' option:
![]()
![]() The edition of a scope is done with the icon closed to the scope entry in the scope panel :
The edition of a scope is done with the icon closed to the scope entry in the scope panel :
For both options, the following pop-up is presented: (mandatory fields marked with a red '*'):
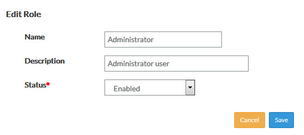
- Name: it must be unique.
- Description
- Status:
- Enabled: by default.
- Disabled: with that status, the role is not active (permissions not set).
![]() The deletion of a scope is done by the icon closed to the scope entry in the scope panel:
The deletion of a scope is done by the icon closed to the scope entry in the scope panel:
When deleting a role, the system raises a warning if the role is associated with a user context. The message mentions the number of users but it is not a blocking issue. It is possible to go forward. If so, there is a risk of having users without any access rights if they had only that role.
Features/Permissions
![]() The additional information attached to a role is visible when selecting the icon closed to the scope entry in the scope panel:
The additional information attached to a role is visible when selecting the icon closed to the scope entry in the scope panel:
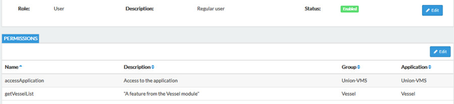
For each permission in the role, the following information is available:
- Name of the feature
- Description of the feature
- Group: used to classify filters together when they are applied on a same business object
- Application: application exposing and using the feature
It should be noted that a role can be based on permissions coming from multiple applications.
Modify a role definition
![]() In the screen for consulting the datasets of a scope (cfr previous point), the following icon is available to modify the list:
In the screen for consulting the datasets of a scope (cfr previous point), the following icon is available to modify the list:
A screen displays a set of filters to search for features proposed by all applications:
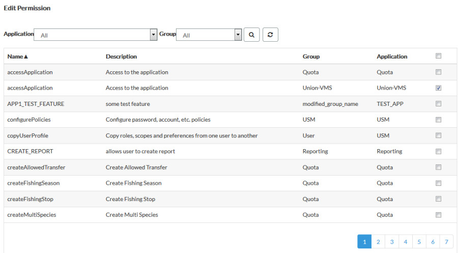
- Application: one entry in the list of applications linked to USM and providing permissions;
- Group: one entry in the list of groups defined in applications. A group is used to gather a list of permissions acting basically on a same functional object inside an application (ex: consulting, editing, deleting a vessel …)
The result of the search is displayed below the set of filters. The list of permissions is displayed with at the end of each entry of the list a check box which is ticked if the permission is already in the role being modified. The management of permissions of the role is done by selecting or deselecting the check boxes for permissions.
This process shows that a role can be based on permissions coming from multiple applications.
How to manage Scopes
Information about scopes is accessible through the 'Scopes' option from the main menu:
![]()
The web screen provides a set of filters to find back the scopes:
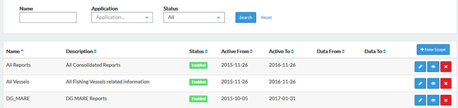
- Name: A set of characters can be provided. The search is performed on the scope name. The position of the characters in the name is not important;
- Application: selection of an entry in the list of applications linked with USM;
- Status:
- Enabled: valid/active scope with a set of filters
- Disabled: inactive scope
The result of the search is displayed below the set of filters.
When there is no data corresponding to the search criteria, the message 'No result found.' is displayed.
If the search is successful, the list of scopes matching the criteria is displayed with the following information:
- Name
- Description
- Status
- Active from
- Active to
- Data From: when specified, date from which any data filtered by the scope will be selected
- Data To: when specified, date until which any data filtered by the scope will be selected
The data from/to is a general filter of the scope. ![]()
The creation of a scope is done by selection the 'New' option:
![]() The edition of a scope is done with the icon closed to the scope entry in the scope panel :
The edition of a scope is done with the icon closed to the scope entry in the scope panel :
For both options, the following pop-up is presented: (mandatory fields marked with a red '*'):

- Name: it must be unique.
- Description
- Status:
- Enabled: by default.
- Disabled: with that status, the scope is not active (filters not applied).
- Active from
- Active to
- Data From: when specified, date from which any data filtered by the scope will be selected
- Data To: when specified, date until which any data filtered by the scope will be selected
![]() The deletion of a scope is done by the icon closed to the scope entry in the scope panel:
The deletion of a scope is done by the icon closed to the scope entry in the scope panel:
Datasets
![]() The additional information attached to a scope is visible when selecting the icon closed to the scope entry in the scope panel:
The additional information attached to a scope is visible when selecting the icon closed to the scope entry in the scope panel:

For each dataset in the scope, the following information is available:
- Name
- Description
- Category: used to group filters together when they are applied on a same business object
- Application: application exposing and using the filter
Modify a scope definition
![]() In the screen for consulting the datasets of a scope (cfr previous point), the following icon is available to modify the list:
In the screen for consulting the datasets of a scope (cfr previous point), the following icon is available to modify the list:
A screen displays a set of filters to search for datasets proposed by all applications:
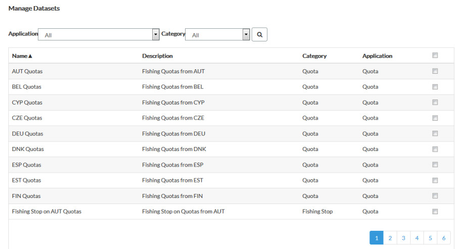
- Application: one entry in the list of applications linked to USM and providing datasets;
- Category: one entry in the list of categories defined in applications. A category is used to gather a list of datasets acting basically on a same object inside an application.
The result of the search is displayed below the set of filters. The list of datasets is displayed with at the end of each entry of the list a check box which is ticked if the datasets is already in the scope being modified. The management of datasets of the scope is done by selecting or deselecting the check boxes for datasets.
This process shows that a scope can be based on datasets coming from multiple applications.
How to view Application information
Information about applications linked to USM is accessible through the 'Applications' option from the main menu:
![]()
The web screen provides a set of filters to find back the applications:
- Name search: A set of characters can be provided. The search is performed on the application name. The position of the characters in the name is not important;
- Parent: a hierarchy of applications can be registered in USM. For instance, USM module under U-VMS application. This filter is used to find the 'upper root' of applications;
The result of the search is displayed below the set of filters.
When there is no data corresponding to the search criteria, the message 'No result found.' is displayed.
If the search is successful, the list of applications matching the criteria is displayed with the following information:
- Name
- Description
- Parent
How to view data exposed by Applications
Information about applications linked to USM is accessible through the 'Applications' option from the main menu:
![]()
Data exposed by each application and registered in USM for defining roles and scopes, basis of the user contexts (access rights), are visible by selecting the icon closed to the entry in the organisation panel.
The web screen shows a tab by type of data exposed by an application:
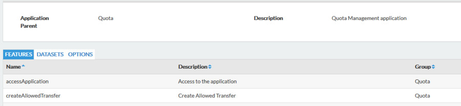
- Features: functions of the application:
- Name
- Description
- Group: used to classify the features

- Datasets
- Name
- Description
- Category: used to classify the datasets
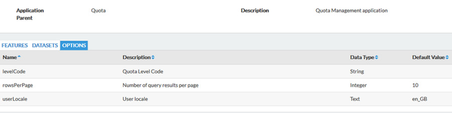
- Options:
- Name
- Description
- Data type
- Default value
How to validate user changes
The system can be configured in such a way that any changes of personal data done by a user must be validated by a USM administrator before to be registered (cfr Policies).
If this setting is active, the option 'Changes' appears in the main menu:
![]()
The list of following information is available when new changes to be validated are pending:

- Username: to identify the user
- Phone number: new value is any
- Mobile number: new value is any
- Fax number: new value is any
- Email: new value is any
The icon available in each entry of the list gives access to the validation screen.
The old and new values are displayed with options to reject, accept or cancel the operation:
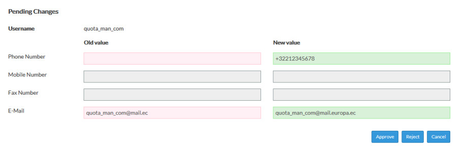
If accepted, the user information is immediately updated in the system.
In this version of USM, the user is not notified about the decision of the administrator.
Section 12 Activity
Activities list
When the user accesses the activity tab, the first view is the activities list where the user can search for fishing activities.
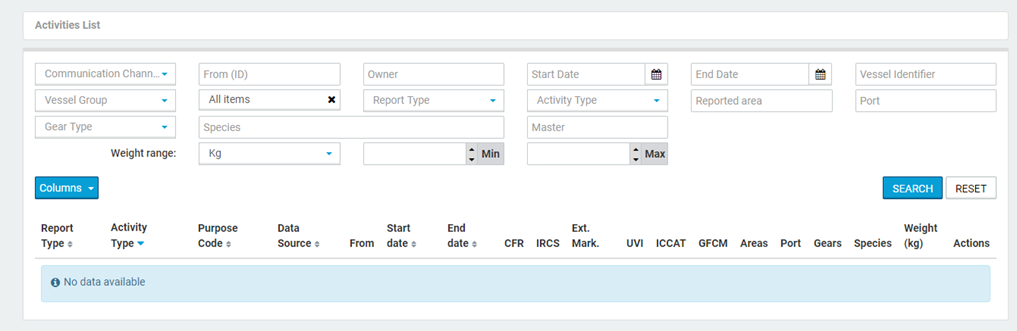
After the button is pressed, the list of fishing activities is displayed according to the applied filters.
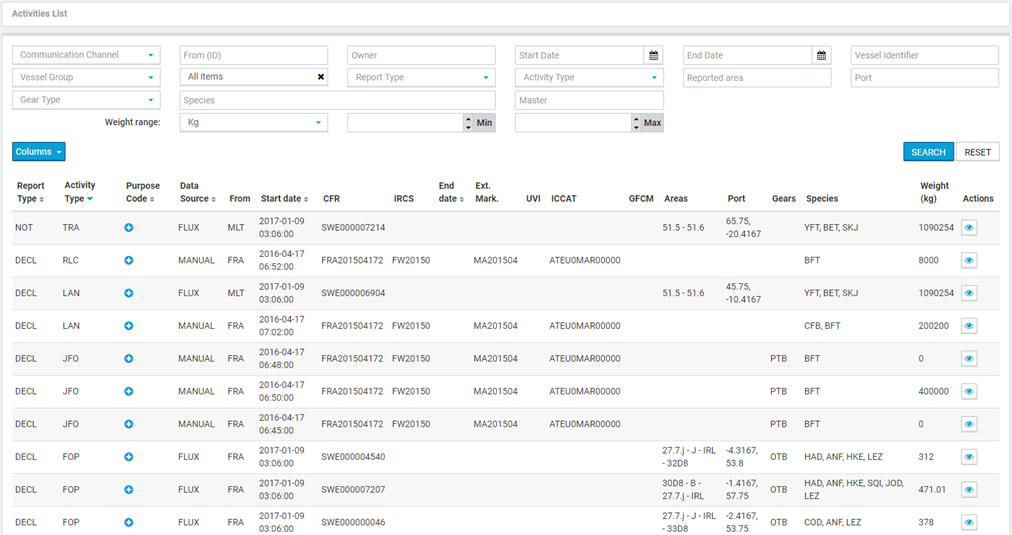
Filters

| Field type | Description | |
|---|---|---|
| 1 | Communication Channel | Data source |
| 2 | From (ID) | Country code |
| 3 | Owner | |
| 4 | Start Date | |
| 5 | End Date | |
| 6 | Vessel Identifier | |
| 7 | Vessel Group | |
| 8 | Purpose Code | |
| 9 | Report Type | Notification or declaration |
| 10 | Activity Type | Fishing activity type |
| 11 | Reported area | |
| 12 | Port | |
| 13 | Gear Type | |
| 14 | Species | |
| 15 | Master | |
| 16 | Weight range - Unit | |
| 17 | Weight range - Min | |
| 18 | Weight range - Max |
Columns visibility
In order to make easier to see only the most relevant columns, the user can hide columns from the table:

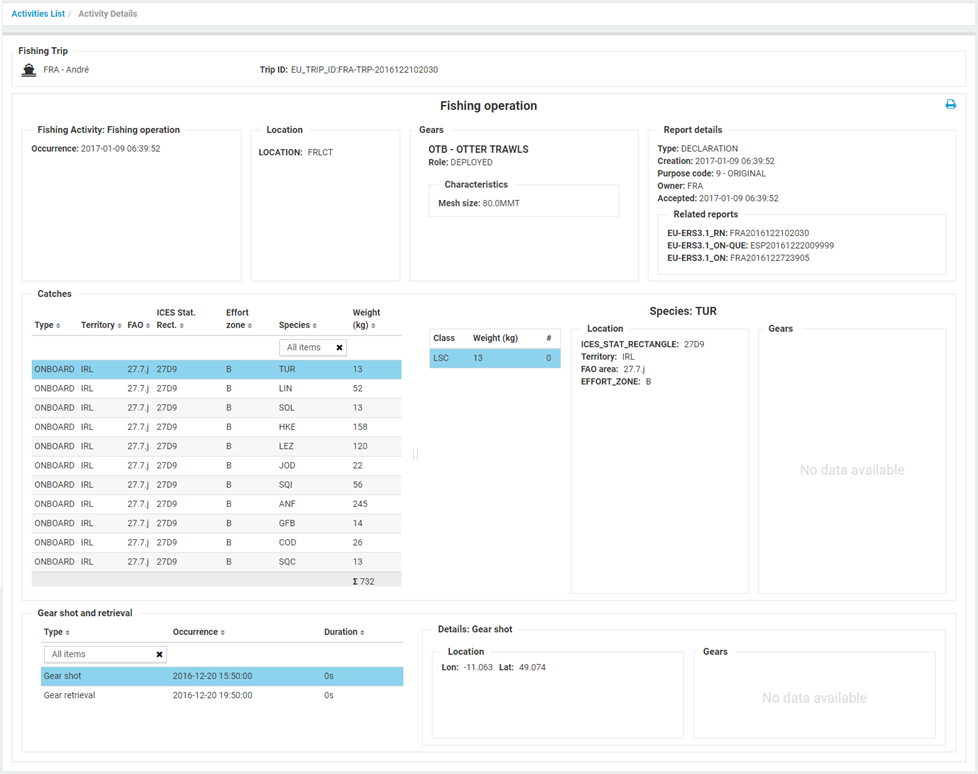
Fishing activity
From the activities list, it’s possible to access its details by pressing the  button.
There are many types of fishing activities:
-Departure;
-Landing;
-Arrival;
-Fishing operation;
-Area entry;
-Area exit;
-Discard;
-Joint fishing operation;
-Relocation;
-Transhipment.
In each one of them the layout differs depending on the information to be displayed.
Widgets
In the fishing activity views, there are several tiles to display the different details of each fishing activity. Next, you will find them:
Fishing activity details
Describes the global details of the fishing activity.

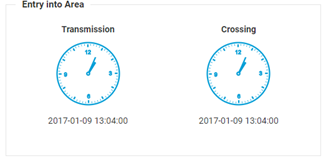
Area information
Displays the times about the area entry.
Location
Tells the locations where the fishing activity occurs.

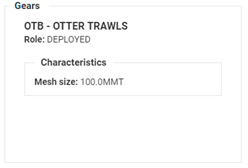
Gears
Describes the gears used in the fishing activity.
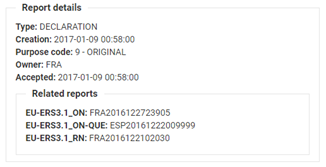
Report details
Describes the report document details.
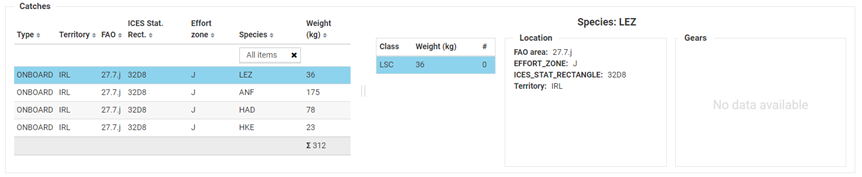
Catch details
Displays the information related to the catches.
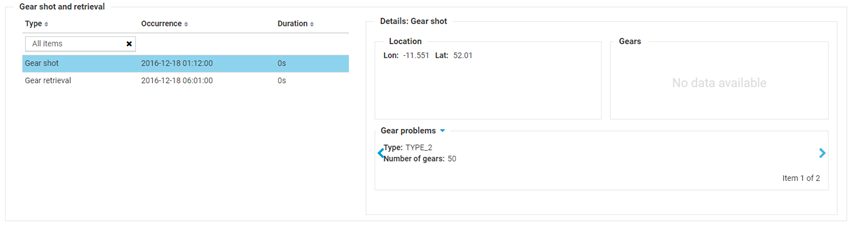
Gear shot and retrieval
Describes all the information related to gear shot and retrieval (including their gear problems).
Vessel details
Description related to vessels.

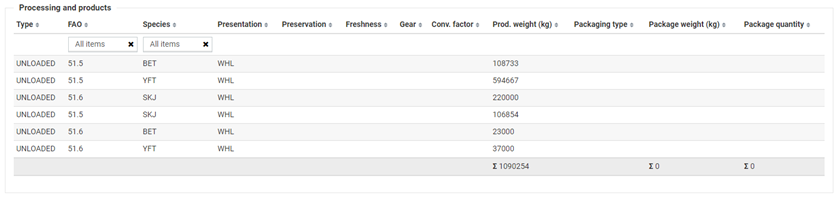
Processing and products
Table with all the information related to processing and products.
Fishing trip overview
Information about the trip of the fishing activity.

Section 13 MDR (Master data register)
MDR contains data structures and lists of fisheries codes to be used in electronic information recording and exchanges among Member States and for Member States' communications with Norway with the purpose to record and report fishing activities. In UnionVMS, there’s a module to cache all this lists of codes in order to be used in the application without depending on the European commission.
To access the MDR configuration view, the user has to be administrator privileges. In the admin tab of the main menu -> Configuration -> MDR.
This cache can be synchronized with the European commission in 2 ways: automatically or by the user through the application’s interface.
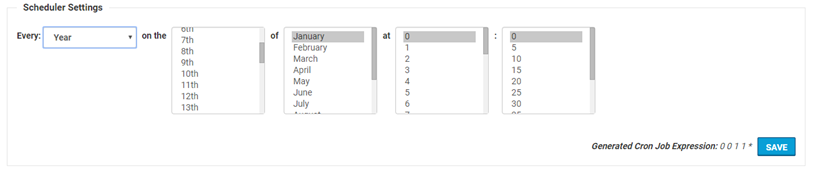
Synchronize automatically with a cron job
Depending on the system needs, the admin can schedule the synchronization to happen every:
-minute;
-hour;
-day;
-week;
-month;
-year.
In case the user doesn’t want to auto-update all the code lists, it can  /
/  in the auto-update column.
Manually
The admin can synchronize all code lists or only some of them depending of its needs.
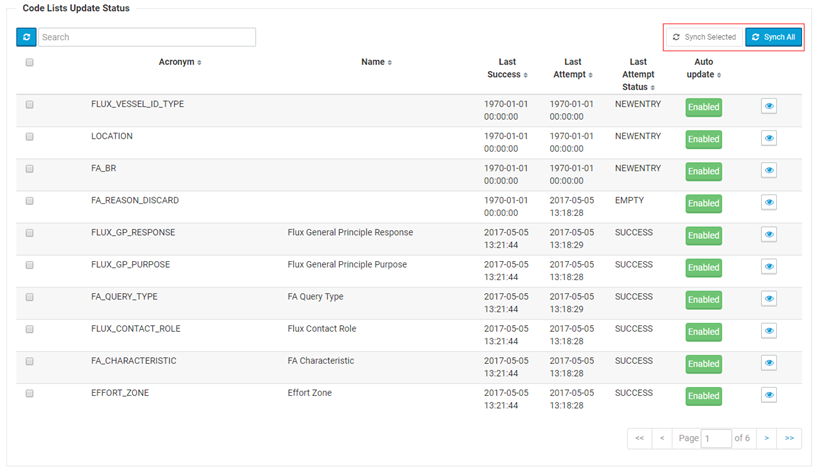
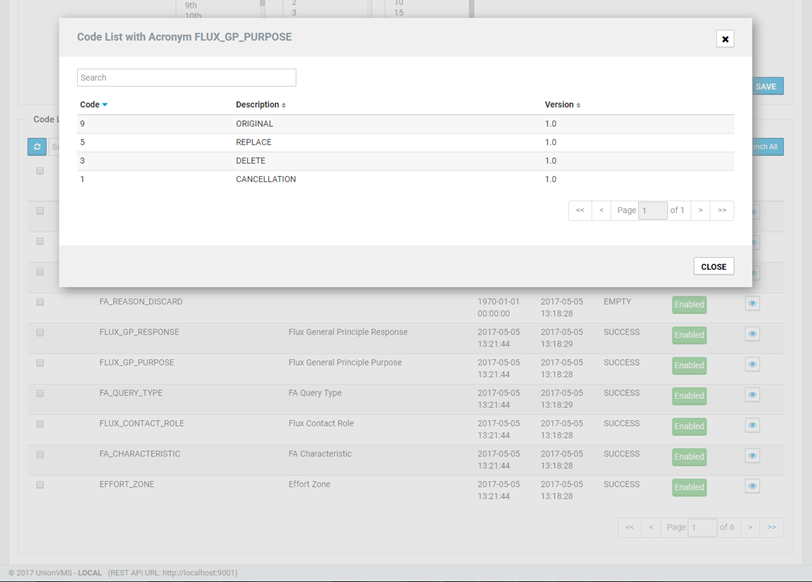
It’s also possible to visualize the contents of every code list by pressing the  button:
Section 14 Configurations
The configurations are present in several levels: admin, user and report.
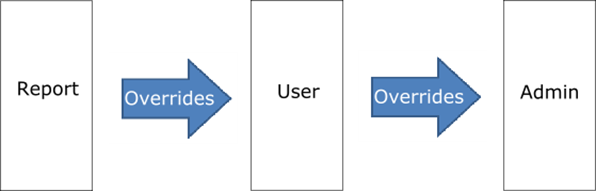
Admin - these configurations are set by an administrator and they are the default settings of the application.
User – the user settings are defined by any user with permissions. These settings override the default ones defined in admin configuration.
Report (map configuration) – settings defined in a specific report. These settings override the previous ones.
There are several sections in every configuration view:
-General settings;
-Map settings;
-Style settings;
-Visibility settings;
-Layer Settings;
-Reference data settings.
General settings
In this section, the user can set the Geoserver URL and the Bing Maps API Key. It’s available in the admin configuration.

Map settings
This section has all the settings related to the maps in the application and it’s available in all the configuration levels (admin, user and report). The auto-refresh configurations are only present at the admin and user levels.

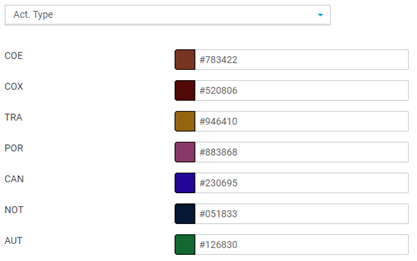
Style settings
It’s possible to stylize the different components in the map (positions, segments and alerts).
For positions and segments it’s possible to set different colours depending on some properties:
- Flag state;
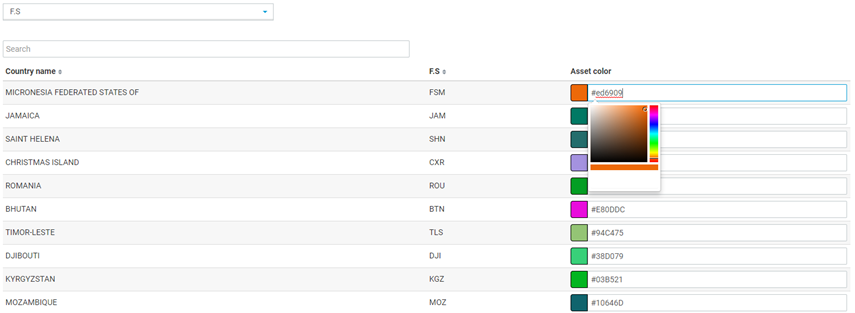
- Measured speed, calculated speed and course;
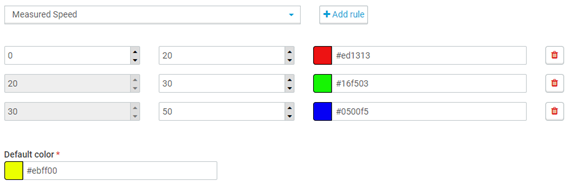
- Message type;

- Activity Type.
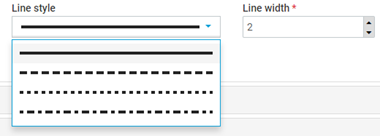
We can also change the segment’s styles in the map but selecting a new line shape and width:
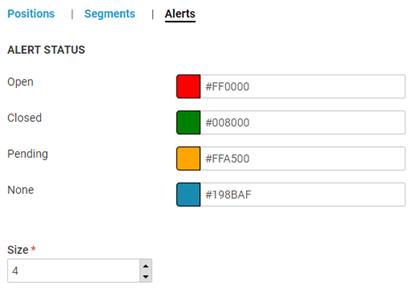
For the alerts, the user can define a different colour for each state and its size in the map:
Visibility settings
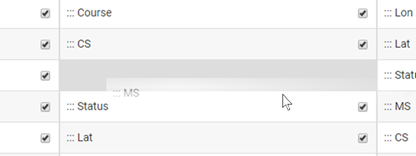
This section controls the visibility of the properties in the vms table, popups and labels from map. These settings can be applied differently to positions, segments and tracks.
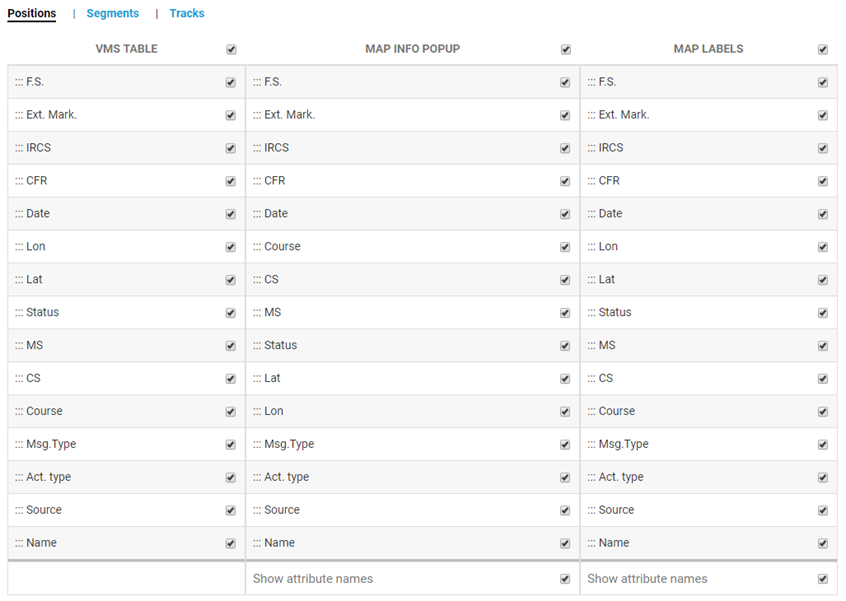
It’s also possible to change their order, depending on the user preferences, by dragging the field to another place.
Layer Settings
We have four different types of layer settings. They are backgrounds, Additional cartographies, areas and ports.
- The layer selection is done by dragging the item from the left side list to the right side list of the same category.
- At least one background layer should be selected.
The examples of all types of layer settings are shown below:
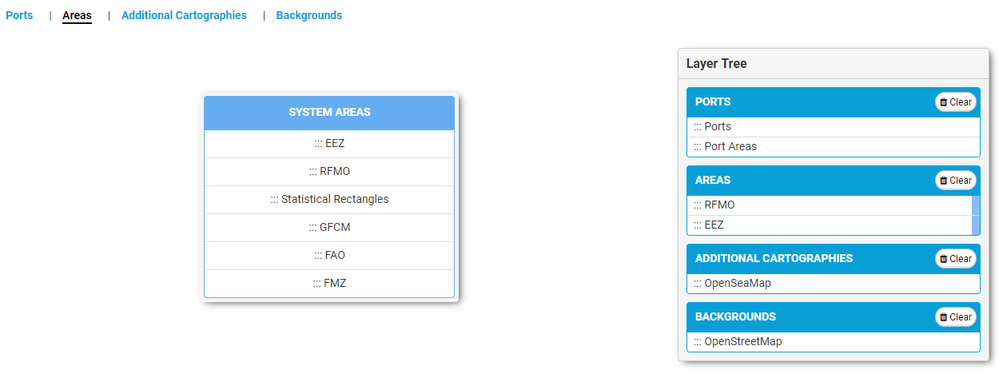
Reference data settings
This section manages the visible areas in every reference data layer. The user can selected them all or customize its selection by selecting only some areas in the following ways:
- The user can select the areas either in the map
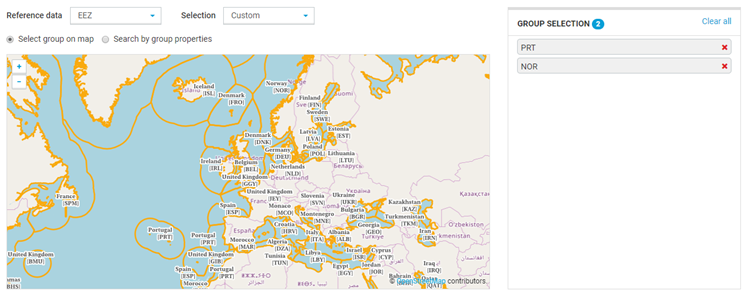
- Or it can do a search
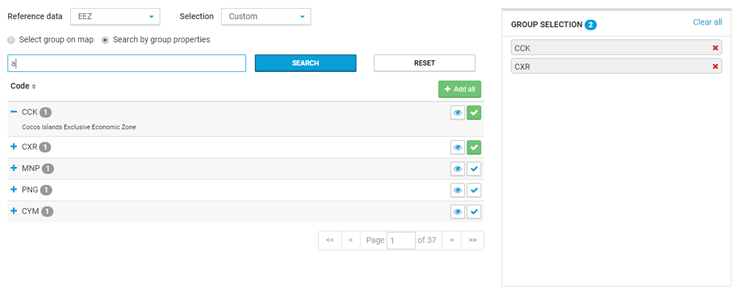
Section 15 Glossary
| Term as used in Union VMS | Explanation |
|---|---|
| Application | it is a computer program designed to perform a group of coordinated functions, tasks, or activities. An application can be linked to USM. If so, it means that: The application delegates the user authentication task to USM; The application can request to get or to verify the access rights of a user; The application exposes through a USM service a set of information used by USM to create user contexts; |
| Communication channel | A medium through which a message is transmitted to its intended audience. A communication channel in USM is attached to an endpoint and it specifies the type of messages that could be transmitted through. |
| Context | a context is always for a user but a user may have multiple ones. It is a container of three elements defining his framework for one or multiple applications. In basic terms, the container defines the WWH for each user: 'What can he do', 'What can he see', 'How he wants to see data'. The three elements are: Role: list of permissions to limit the actions of the user (The first W). It is the only mandatory element of a context; |
| Dataset | it is a business information of an application that can be used to limit the access to data for a user, so a kind of filter. An application linked to USM may register in USM the list of his datasets that are used to create the context of a user; |
| Endpoint | it is a technical node in a network used for message exchanges. Technical information is stored in USM at the level of an organisation. |
| Feature | it is a function of an application. An application linked to USM must register in USM the list of his features that are used to give permissions to a user; |
| IDM system | Identity Management system used mainly to manage user data and credentials. |
| LDAP | Lightweight Directory Access Protocol system used to share corporate data like user information across an organisation or over internet. |
| Module | it is a synonym of "application" but this notion implies usually that a module is linked to a parent application. |
| Option | it is a parameter of an application that can be used by users to customize the layout (color of lines …) or the behaviour (refresh rate of a report …) of the application. An option has always a default value. When included in a user context, the option (with a specific value chosen by the user) becomes a user preference. An application linked to USM may register in USM the list of his options that are used to configure the context of a user; |
| Permission | it is a feature in a role affected to a user; |
| Profile | it is the set of all contexts attached to a user; |
| Role | it is a set of permissions on one or multiple applications; |
| Scope | it is a set of datasets from one or multiple applications. The scope is defined to limit the access to data when used in a user context; |