Docker Installation
- Oscar Djupfeldt
- pether sorling
- Peter Johansson
UnionVMS is not yet production ready and the Docker images have not been tested in a production like environment yet.
If you are running on Windows or OSX, please note that container clocks will fall out of synch when the computer is put to sleep or powered off. To resolve this, restart Docker after waking the computer.
Running released docker images available at https://hub.docker.com/r/uvms/
The simplest way to install and run Union-VMS in docker environment is to follow these step:
- Make sure docker is installed. See https://www.docker.com/products/overview for information on how to install Docker on your system.
- If you are installing on Windows, make sure that the C drive is shared with Docker https://docs.docker.com/docker-for-windows/#shared-drives and configured docker with at least 8192 MB of memory.
Download the latest version of docker-compose for UnionVms at http://nexus.focus.fish/nexus/repository/releases/eu/europa/ec/fisheries/uvms/docker/docker-compose/3.22.0/docker-compose-3.22.0.yml (or any other released version from nexus)
Run
Latest releasedocker-compose -f docker-compose-3.22.0.yml up -d
After about 5-10 minutes, you will be able to access the system at http://localhost:28080/unionvms/ and be able to login with the username/password vms_admin_com/password . Union-VMS is running with a default configuration using the version specified in docker-compose.yml file.
To stop Union-VMS, use "docker-compose stop" and "docker-compose start" to start it again.
Using "docker-compose up" always starts the system from a clean slate. This means that any data in the database is lost if the command is used after the first start.
Use "docker-compose stop" and "docker-compose start" to stop and start an already running system
When installing Union-VMS this way, the containers behave similarily to virtual machines, they are isolated from each other and the host OS. The only exceptions to the isolation are the mapped ports and volumes.
| Container | Port mapping (host:container) |
|---|---|
| Wildfly | 29990:9990 28080:8080 |
| ActiveMQ | 18161:8161 |
| PostgreSQL | 25432:5432 |
This means that the host can access the Wildfly administration console, the Wildfly debug interface, the ActiveMQ administration console and the PostgreSQL databases. It can also access the logs produced by the modules, Wildfly and ActiveMQ.
For more information on Docker compose and how to use it, please read their documentation at https://docs.docker.com/compose/overview/
Connect using Jconsole (Wildfly)
Connect using jconsole.bat|sh provided with the wildfly installation: wildfly-8.2.1.Final\bin\jconsole.bat|sh
After startup choose "remote" and specify url "service:jmx:http-remoting-jmx://localhost:29990" (username/password admin/admin) .
Change logging levels at runtime
After connected with jconsole above, in the tab MBeans you will find logback for all apps that expose operations to change loglevels at runtime.
Follow the guide at https://logback.qos.ch/manual/jmxConfig.html
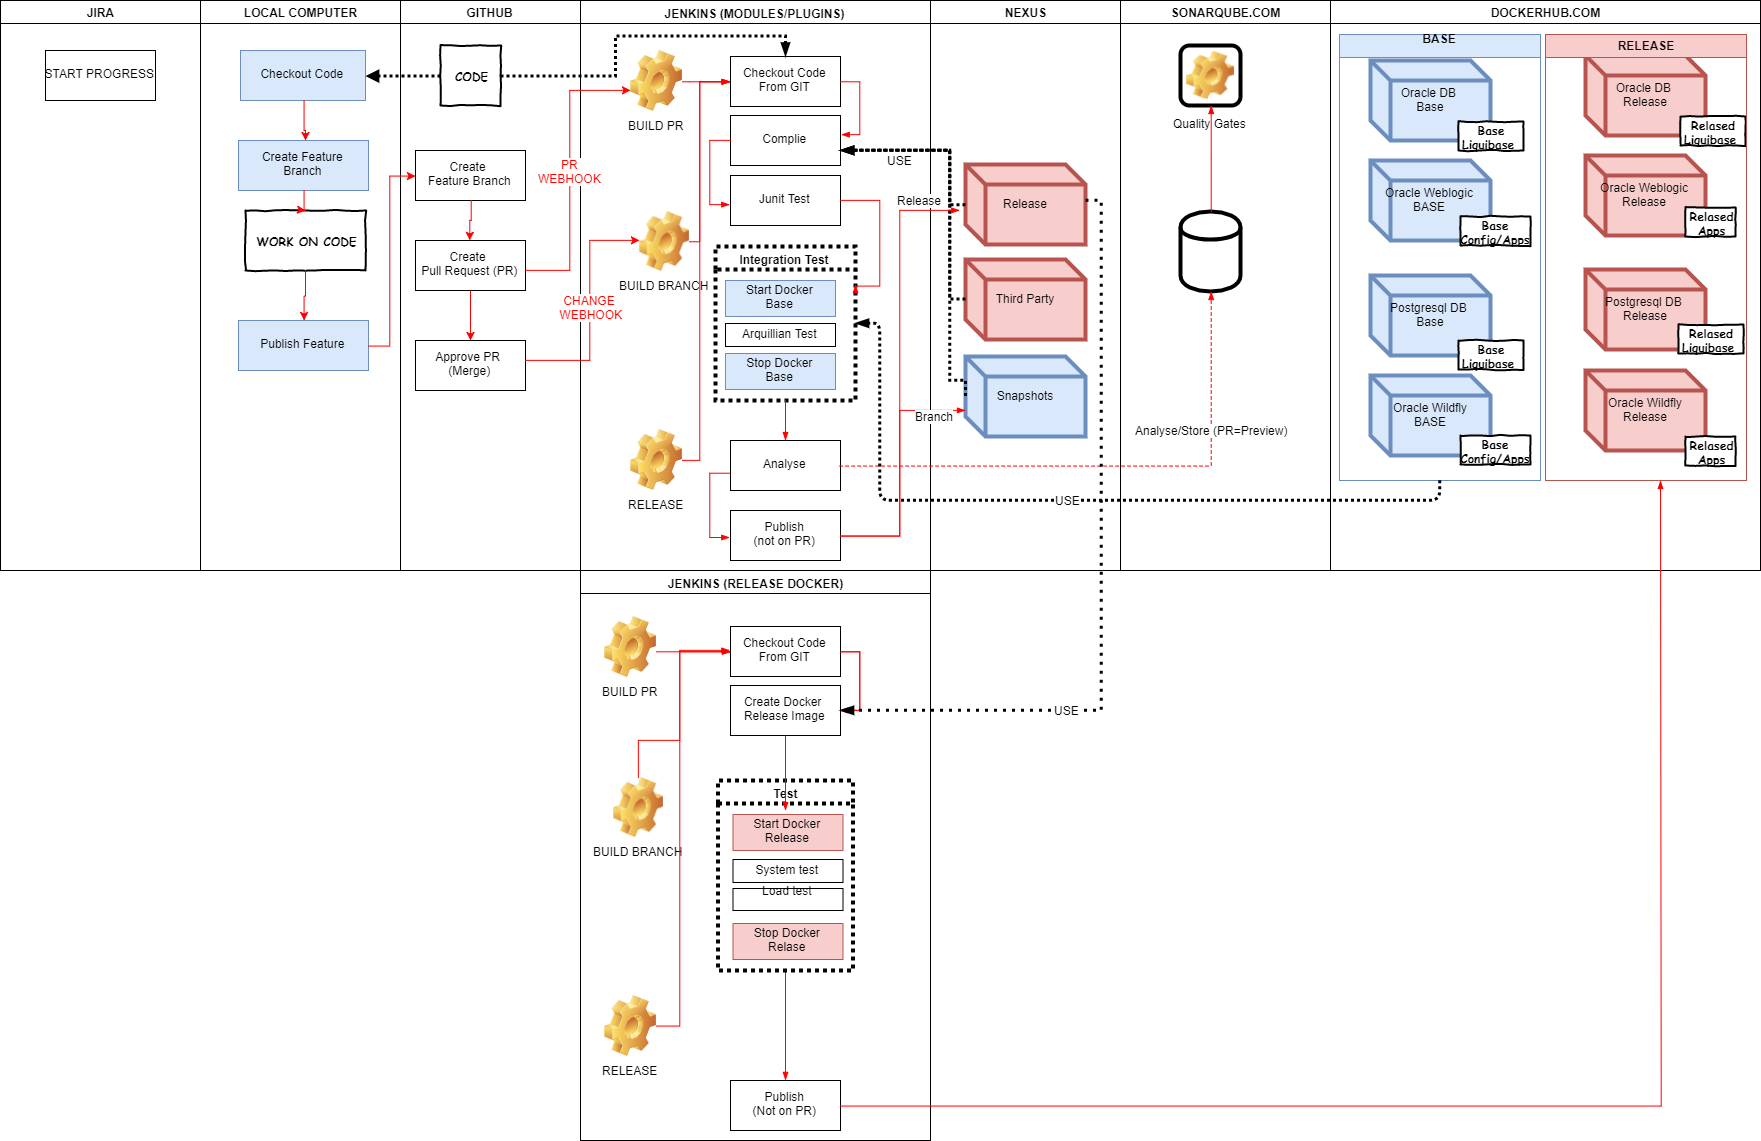
Development of https://github.com/UnionVMS/UVMS-Docker/.
Resources
Jenkins at https://jenkins.focus.fish/job/UVMS-Docker-dev-test/ will build images and run release-test validating some of the rest api:s and small part of the frontend at every commit or pull request at https://jenkins.focus.fish/view/UVMS%20Pull%20Requests/job/UVMS-Docker-Pull-Request/ .
Latest test result : https://jenkins.focus.fish/job/UVMS-Docker-dev-test/eu.europa.ec.fisheries.uvms.docker$uvms-release-test/test_results_analyzer/
Performance report (Last build) : https://jenkins.focus.fish/job/UVMS-Docker-dev-test/lastSuccessfulBuild/artifact/release-test/target/contiperf-report/index.html
App logs (Last build) : https://jenkins.focus.fish/job/UVMS-Docker-dev-test/lastSuccessfulBuild/artifact/release-test/target/app-logs/
Server logs (Last build) : https://jenkins.focus.fish/job/UVMS-Docker-dev-test/lastSuccessfulBuild/artifact/release-test/target/server-logs/
Asset monitoring report (Last build) : https://jenkins.focus.fish/job/UVMS-Docker-dev-test/lastSuccessfulBuild/artifact/release-test/target/asset_monitoring.pdf
Mobile terminal montoring report (Last build) : https://jenkins.focus.fish/job/UVMS-Docker-dev-test/lastSuccessfulBuild/artifact/release-test/target/mobileterminal_monitoring.pdf
Movement monitoring report (Last build) : https://jenkins.focus.fish/job/UVMS-Docker-dev-test/lastSuccessfulBuild/artifact/release-test/target/movement_monitoring.pdf
Requirements
The below is needed if you want to contribute to the UVMS-Docker images.
- Make sure docker is installed. See https://www.docker.com/products/overview for information on how to install Docker on your system.
- If you are installing on Windows, make sure that the C drive is shared with Docker https://docs.docker.com/docker-for-windows/#shared-drives and configured docker with at least 8192 MB of memory.
- Download and install at least version 3.3.9 of Maven from https://maven.apache.org/download.cgi
- Clone the git repository https://github.com/UnionVMS/UVMS-Docker.git and checkout branch dev
- git clone https://github.com/UnionVMS/UVMS-Docker.git
- cd UVMS-Docker
- git checkout dev
On Windows 10:
- Download Docker from https://download.docker.com/win/stable/InstallDocker.msi
- Install Docker and allow access to Hyper-V
- Share your C-drive with Docker: https://docs.docker.com/docker-for-windows/#shared-drives (For volume mounting, access to log files)
On Windows 7:
Note: The docker files needs to run in Linux. Before following the steps, first change the file EOL to unix format for all the files
Download Docker from https://www.docker.com/products/docker-toolbox Use Docker tool box version 1.12.3
Install Docker toolbox. This will fetch all the dependent softwares like git, virtualbox etc. Restart the system after install is complete.
Locate kitematic and open the application. By default virtual box is not choosen as the host, so there will an error during start of kitematic. When you see the error start again with choosing start with Virtualbox.
In case if it fails again, there will be an option in kitematic to delete VM and recreate the VM.
Go to Oracle VM virtual box manager and power off the VM.
Increase the memory to 6 GB. (Settings --> System --> Base Memory)
Mount a folder which can be shared between VM and windows 7. Goto settings --> shared folder --> new. Choose a folder path and name it "uvms-logs". (When docker starts there will be log folders created for activemq, wildfly and APP inside this)
Start the VM. (Headless start)
Go to docker cli from kitematics.
Verify that uvms-logs is available in the VM by this command.
- docker-machine ssh default
- cd /uvms-logs (This should be empty)
- exit
Go to virtual box and add new port forwarding settings. Network --> Adapter1 --> Advanced --> Port Forwarding Name : JMX Protocol : TCP Host IP : Your machine IP (e.g. 10.142....) Host Port : 29990 Guest IP : leave it blank Guest Port : 29990
Quick guide
When building the UVMS-Docker projet "mvn clean install" will build the images, start the containers, run test and shut down the containers.
This works well on build servers but in som cases a developer might want to startup the servers and run the release-test directly from the IDE like Eclipse or Netbeans.
NOTE: Mvn will check to enforce JDK7, if you need to run it with some other jvm turn of the check using "-Dfocus-pom.enforce.jdk.version.disabled=true"
Build and test docker from root of the project. (builds docker.images and run release-test against containers that will startup before test and shutdown after)
In directory UVMS-Docker
mvn clean install
Build and test docker and include front-end test from root of the project. (builds docker.images and run release-test against containers that will startup before test and shutdown after)
In directory UVMS-Docker
mvn clean install -Pfrontend-test
Build and test docker and include postman/newman test from root of the project. (builds docker.images and run release-test against containers that will startup before test and shutdown after)
In directory UVMS-Docker
mvn clean install -Ppostman-test
Build one images, choose one image
In directory UVMS-Docker go into amq/postgres-base/postgres-release/wildfly-base/wildfly-release if you only want to build one image
mvn clean install
Start docker from the release-test project
In directory UVMS-Docker\release-test
mvn docker:start -Dfocus-pom.enforce.jdk.version.disabled=true
Stop docker from the release-test project
In UVMS-Docker\release-test
mvn docker:stop -Dfocus-pom.enforce.jdk.version.disabled=true
Check if they are already started
docker stats
To be able to run the front-end test
You need to install the below requirements
Windows
https://www.python.org/downloads/release/python-362/
pip3 install selenium
pip3 install psycopg2
pip3 install xmlrunner
pip3 install requests
Install latest chromedriver : https://sites.google.com/a/chromium.org/chromedriver/downloads
and add it to the PATH.
Linux (Ubuntu)
Install latest version of chrome and chromedriver
As root user
sudo apt-get install python3-pip
As jenkins user
pip3 install selenium
pip3 install psycopg2
pip3 install xmlrunner
Postman/Newman test
Windows
1. Install Node and npm
https://nodejs.org/en/download/
2. Install newman
npm install -g newman
Linux
1. Install Node and npm
sudo apt-get install npm
sudo apt-get install nodejs-legacy
2. Install newman
npm install -g newman